
In this page
Commit policy as code
Configure the commit policy
Where is the configuration file?
Edit the commit policy
Make changes to the commit policy
Propagate commit policy changes
Work with the commit policy
View the commit policy
Validate the commit policy
View the commit policy insights
Next steps?
Overview
This guide provides an overview of configuring commit policies using the Better Commit Policy Connector app. It focuses on the "x-as-code" approach, on configuring the policy and on working with the policy configured.
Commit policy as code
Better Commit Policy Connector implements the modern approach known as "x-as-code" for commit policies. Generally speaking, policy as code means managing every software components, including policies, as code. For this app in particular, it means defining commit policies through version-controlled configuration files.
This approach offers several benefits:
- Flexibility. It supports defining different policies for different repositories or branches.
- Consistency. Policies are consistently applied across all repositories of the same project, including forks and clones.
- Collaboration. Developer teams can maintain commit policies using familiar workflows. (For example, they can propose and review policy updates using pull requests.)
- Integration. The configuration file written in YAML can be easily integrated with other tools, such as automation frameworks and security platforms.
- Audit trail. Tracking policy changes in Git provides a clear audit trail.
Configure the commit policy
Where is the configuration file?
As you understand by now, you configure your commit policy through a YAML format configuration file checked to the code. The commit policy configuration file is located in the root directory of your repository and is named .commitpolicy.yml.
Edit the commit policy
You can view and edit the configuration file either directly in your local clone or through the Bitbucket web interface.
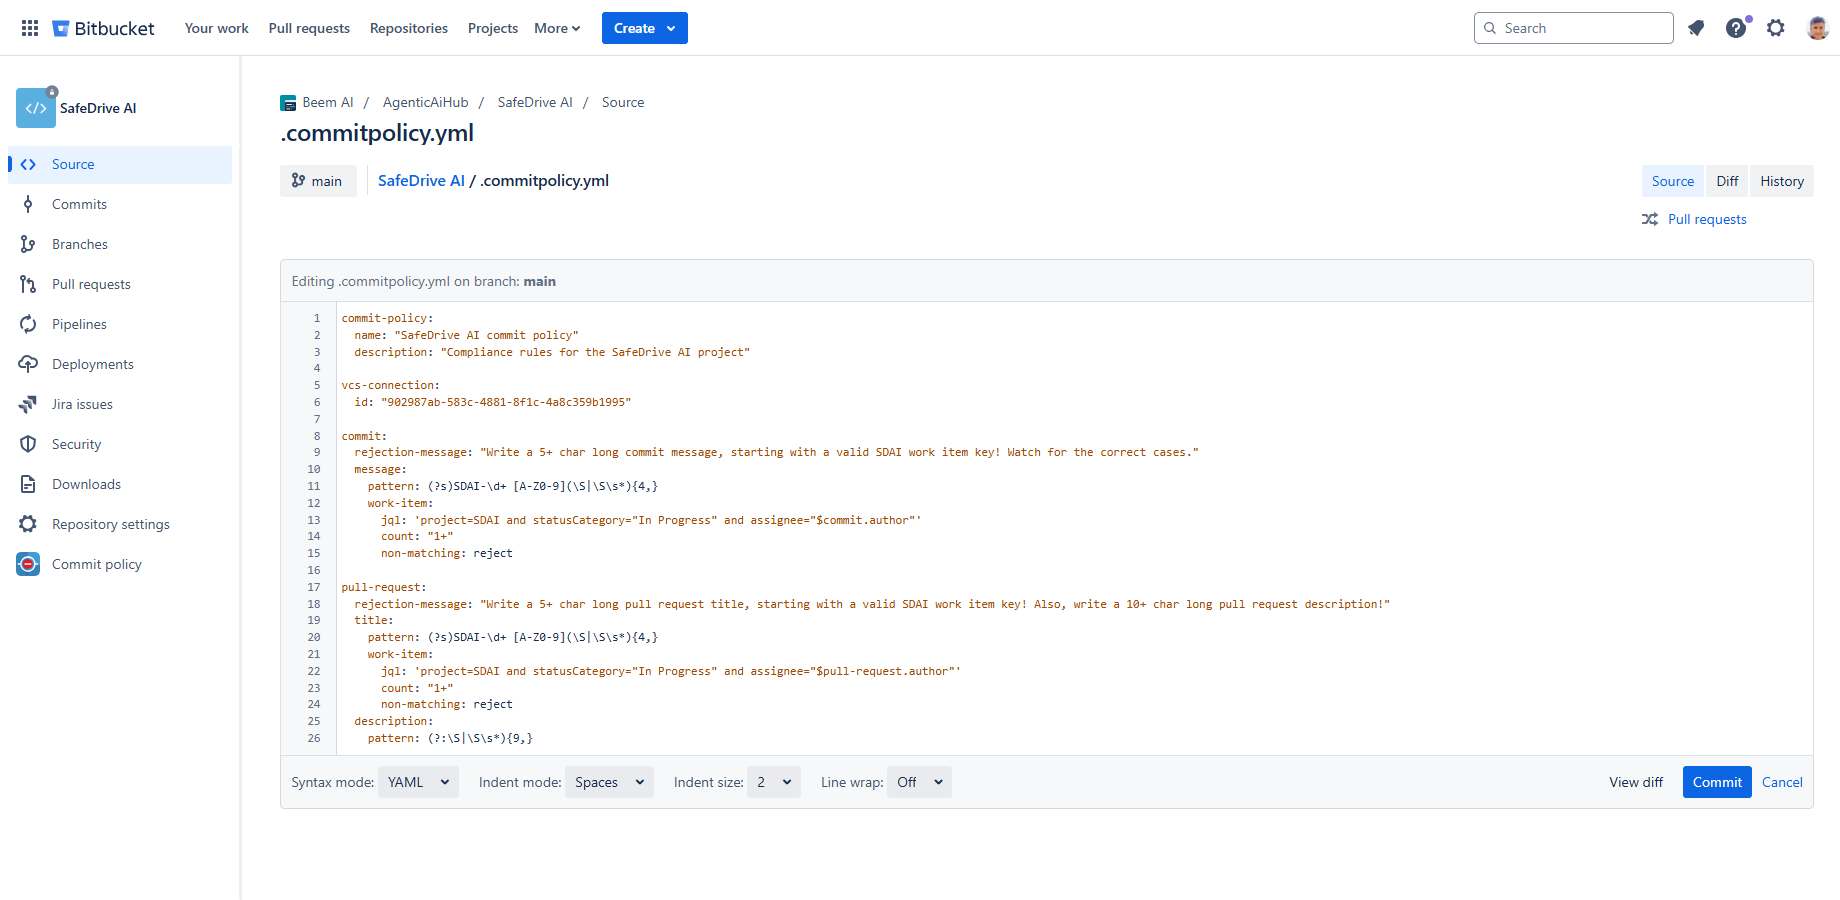
To configure the commit policy, modify the relevant fields in the YAML file. Refer to the configuration reference for details on each field.
Make changes to the commit policy
To modify the policy and contribute the changes to the blessed repository (as the "source of truth"):
- Edit the .commitpolicy.yml configuration file. (You can do this either by editing the locally cloned file in your favorite editor, or by editing the file in the Bitbucket UI.)
- Commit the changes.
- If you edited the file locally, push the changes.
- Unless you edited the file in the blessed repository, send a pull request to the blessed repository.
Propagate commit policy changes
When a policy is updated in the blessed repository, the changes propagate naturally through standard Git operations.
Specifically:
- Creating a new fork: the fork will receive the latest policy configuration.
- Creating a new clone: the clone will receive the latest policy configuration.
- Syncing: the target that pulls (merges) changes from another repository (branch) will receive the updated policy configuration.
It guarantees that all team members operate under the same policy standards without additional manual steps. For example, if the rule for commit message length is updated to require a minimum of 20 characters instead of 10, all forks and clones of the repository will automatically receive this new requirement once they pull the latest code changes.
Work with the commit policy
After the configuration file was added to the repository, you can view and validate it on the Bitbucket UI.
View the commit policy
While the commit policy configuration file is designed to be human-readable, its raw format may not always be the most user-friendly. The Commit policy screen simplifies this by presenting the policy parameters in a structured and visually organized manner.
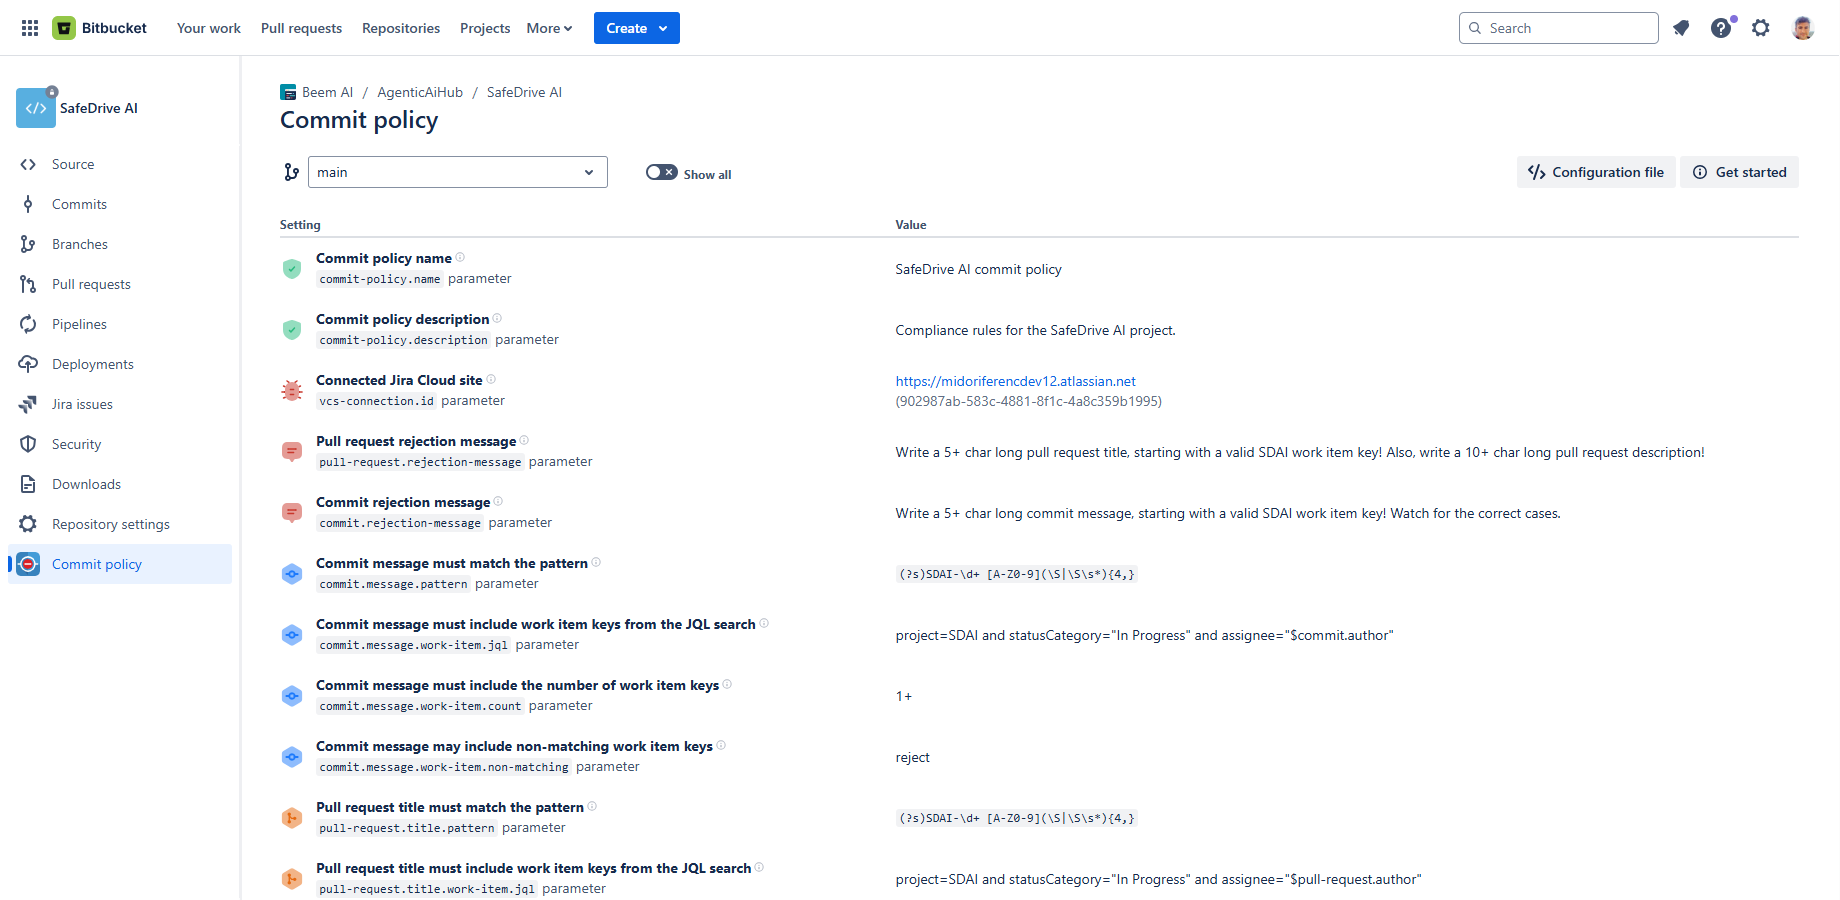
To view the commit policy:
- Navigate to the repository in Bitbucket Cloud.
- Access the Commit policy screen via the left-hand side menu.
The top part includes the following controls:
- Branch selector: You can switch between repository branches to view their specific policies.
- Show All toggle: You can reveal all policy parameters, including default or undefined values, for a complete configuration overview. (By default, the screen shows only those parameters that have values explicitly set in the configuration file.)
- Configuration file button: You can open the commit policy configuration file in a new browser tab to edit it online.
- Get started button: You can access the built-in guide, which will be helpful initially.
Validate the commit policy
After updating the commit policy configuration file, you can use the Commit policy screen to review and validate your changes. It checks for common issues, such as:
- YAML formatting errors
- Unrecognized parameters
- Invalid JQL queries
- Incorrect regular expressions (regexes)
- Invalid boolean values
If there are configuration problems, they will be highlighted next to the affected parameter, making it easy to identify and fix the issue.
View the commit policy insights
You can access the Insights panel from the right-hand sidebar on the Source screen. It gives developers an immediate summary of the commit policy used in the repository.
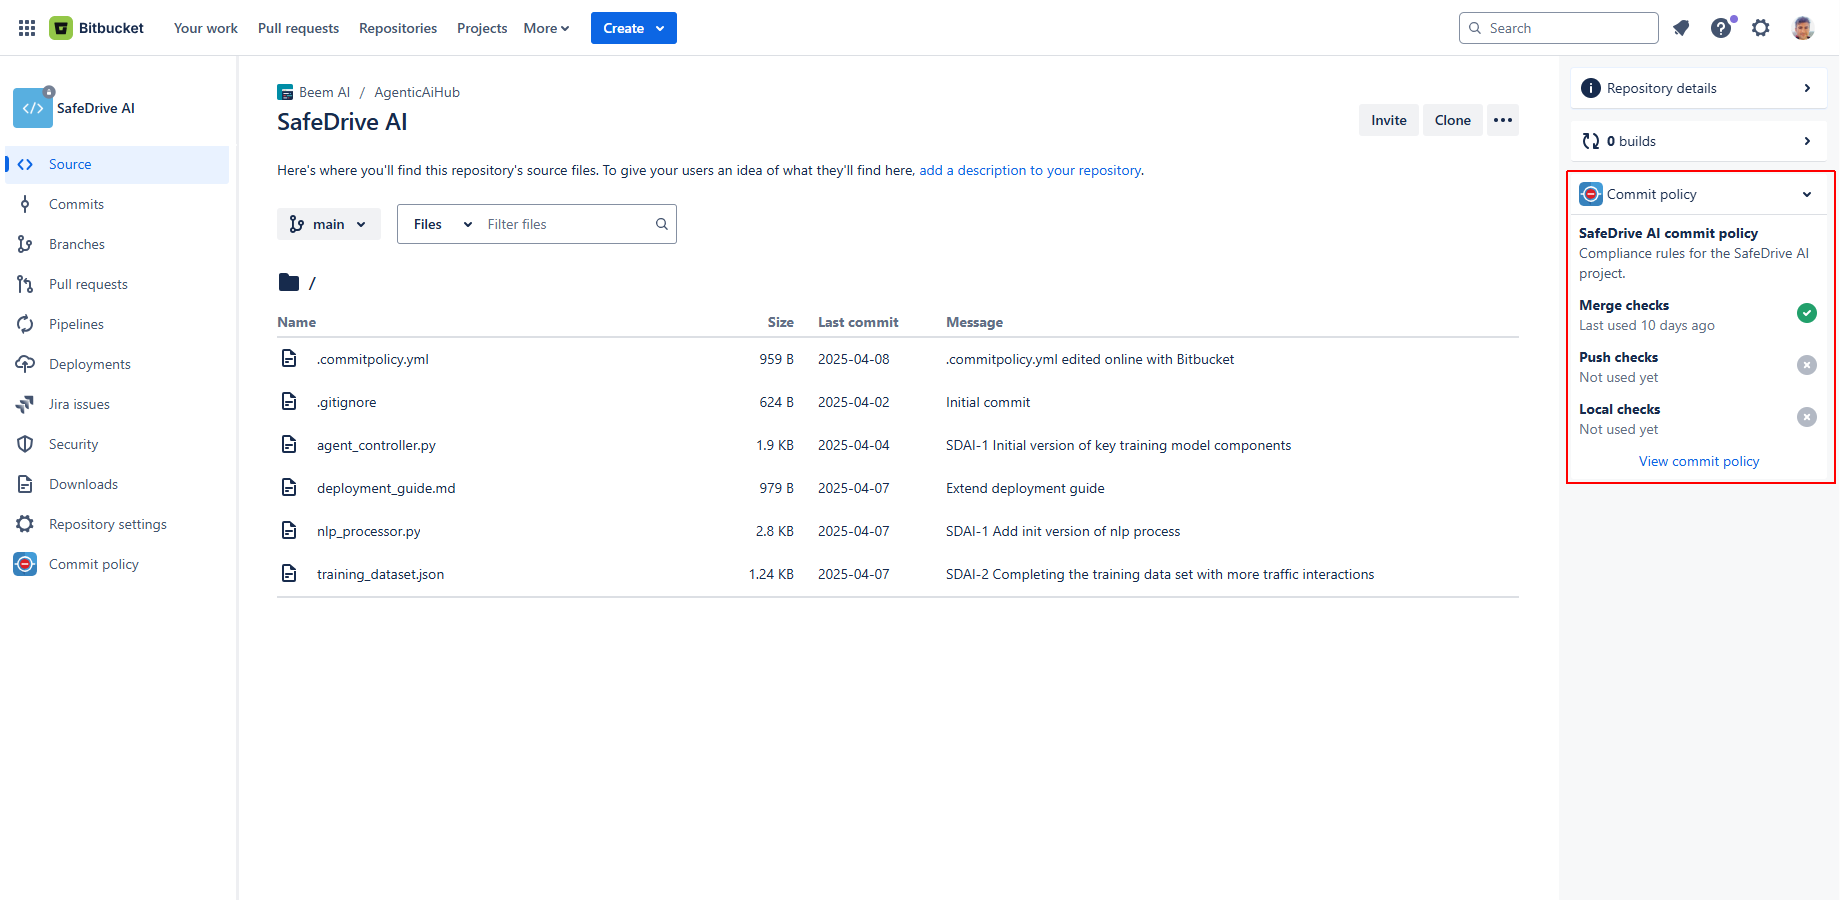
The panel displays the following information:
- Commit policy name (if configured)
- Commit description (if configured)
-
The status of the different checks:
- A green check mark indicates that the check is actively used in this repository.
- The timestamp of the last time the check was run.
Next steps?
For more help with your configuration, refer to these documentation pages:
- The configuration reference explains all available fields and their expected values.
- The recipes page shows common examples, like enforcing a minimum commit message length or requiring work item keys.
- The YAML tips page helps you avoid syntax errors and write clean, readable configuration files.
Questions?
Ask us any time.