In this page
Using the built-in actions
Using the DevOps actions
Run Groovy script action
Working with context variables
Working with issues
Working with smart values
Working with DevOps smart values
Working with built-in smart values
Calculating smart values for other actions and conditions in Groovy
Working with the rule context
Logging
Writing to the audit log
Writing to the Jira log
Advanced topics
Scripts in bulk vs. concurrent execution
Classloading
Limiting running time
Re-using ScriptRunner scripts
What are automation actions?
Actions are the "doer" components of automation rules. They can perform many tasks, such as editing issues, creating sub-tasks, sending notifications, starting CI builds, running scripts, running external programs, and tons more.
There are two types of actions you can use in DevOps automations:
- The Automation for Jira app comes with a large selection of built-in actions designed for general use. These are viable options when designing a new DevOps automation rule.
- The Better DevOps Automation for Jira app comes with additional DevOps actions to solve those use cases where the built-in actions are not sufficient.
It is super-important to understand that the DevOps triggers are compatible with the built-in actions and the built-in triggers are compatible with the DevOps actions. You can freely mix those in automation rules, leveraging best of the two worlds!
Using the built-in actions
You can browse the full list of the built-in actions in the action reference of the Automation for Jira documentation.
For inspiration, we collected some for frequent DevOps automation use cases:
| Action | When to use? | Use case example |
|---|---|---|
| Assign issue | To change the assignee of an issue. | Set the assignee of an unassigned issue to the committer automatically. |
| Comment on issue | To add a comment to an issue. | When initiating a deployment with the @deploy command, capture this in an issue comment, too. |
| Send Slack message | To notify a team or a user via Slack. If Slack is the communication tool your team uses (Slack is a strategic partner of Atlassian!), keep them up-to-date of the code changes without introducing another tool. |
Send a Slack message with customizable information about the new commits, new branches and new tags. |
| Send web request | To automate external tools and services that offer an HTTP-based API. Note that almost every modern DevOps tool offers a REST API. Also, note that you can use this action to communicate with Jira's own REST API! |
Start a build in the CI/CD system when a changeset is accepted in the repository. |
| Transition issue | To automatically transition an issue through a workflow. It keeps the Jira issues and the source code synchronized without efforts. |
Transition an issue from "To Do" to "In Progress" automatically when a commit is created for it. |
Using the DevOps actions
This section explains how to use the additional actions offered by the Better DevOps Automation for Jira app.
Note that although the app provides only one additional action at the moment, we will be adding new ones in future app versions. We need your feedback: tell us what action you'd need for your use case!
Run Groovy script action
This action runs Groovy scripts.
Groovy is an easy to learn, yet powerful programming language that can solve all kind of problems. As scripts can implement literally any logic, this automation action with a proper script will solve any use case for which there is no specific out-of-the-box action!
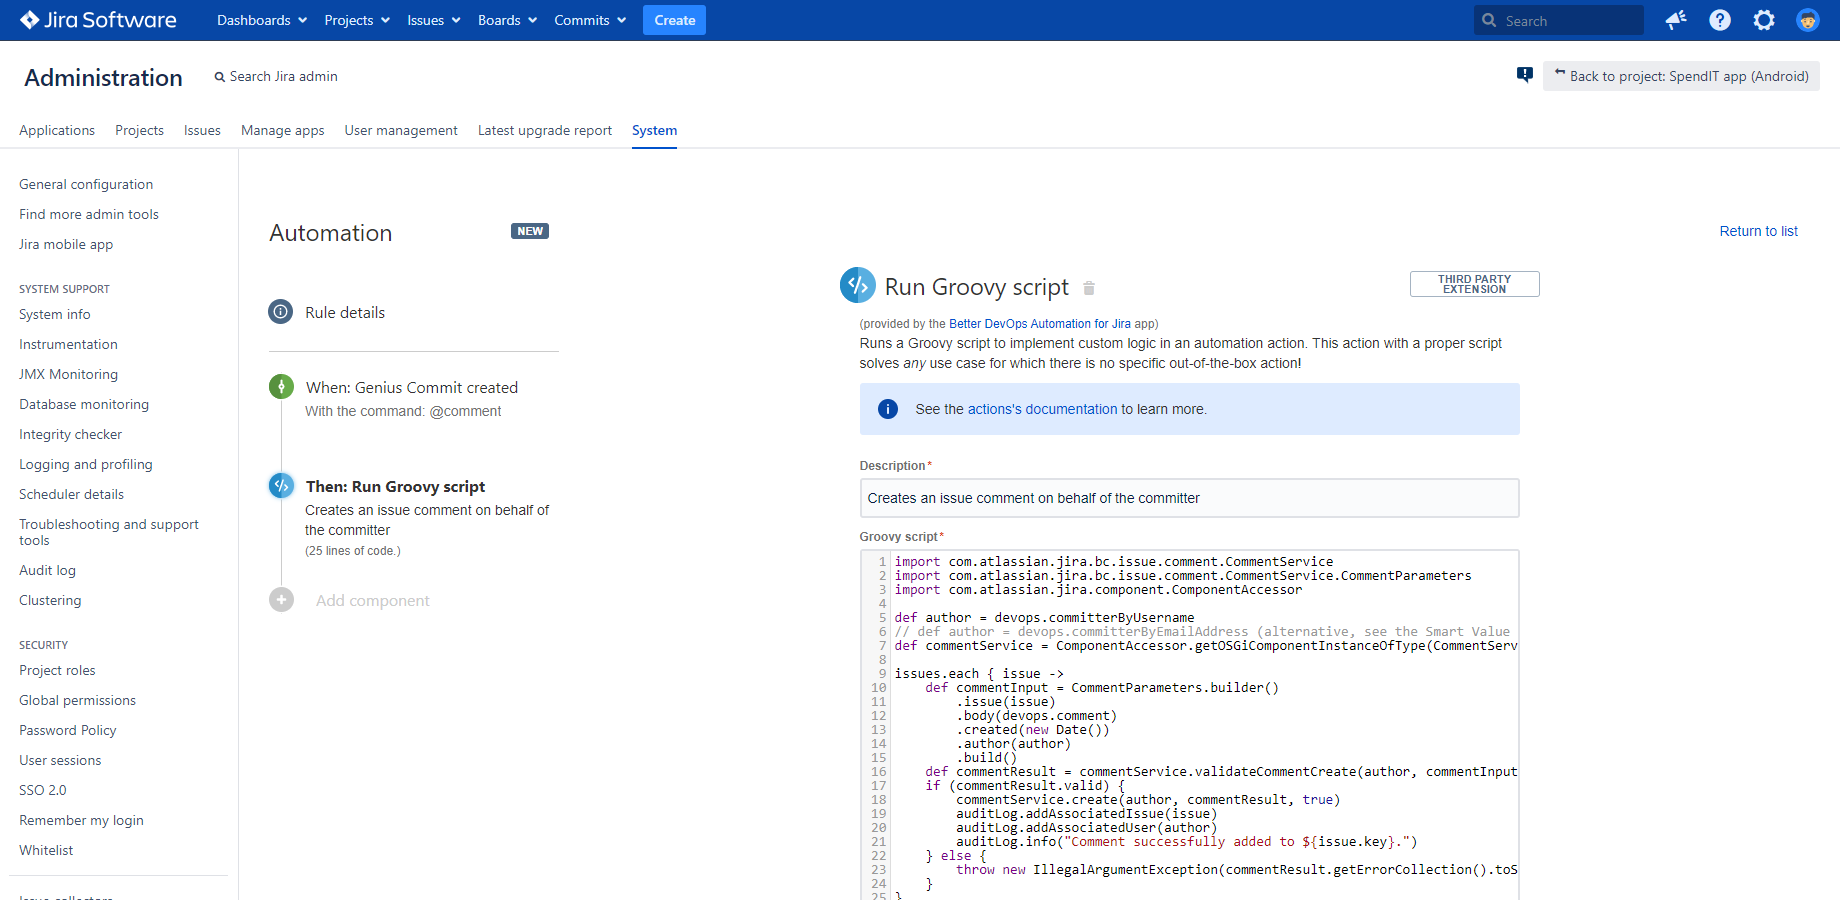
Notes:
- This action can be used with any trigger, not just with the DevOps triggers!
- Supported Groovy language version: 2.5.11.
Working with context variables
Groovy scripts can access the following variables that are pre-populated as "global" variables.
| Variable | Description |
|---|---|
| issues |
The collection of the input issues. (It is a single-element list in concurrent mode.) |
| devops |
The wrapper that provides access to the DevOps-specific smart values. (available only with the DevOps triggers) |
| changesetHelper |
A ChangesetHelper instance. See the method reference. |
| classHelper |
A ClassHelper instance. See the method reference and especially the classloading guide. |
| jiraHelper |
A JiraHelper instance. See the method reference. |
| stringHelper |
A StringHelper instance. See the method reference. |
| auditLog |
Allows easy writing to the audit log. See usage. |
| jiraLog |
Allows easy writing to the Jira log. See usage. |
| ruleContext |
A RuleContext instance with the execution context of the automation rule, provided by the Automation for Jira app. See usage. |
You can access these variables like any regular Groovy variable in your script:
issues.each { issue ->
	def currentIssueKey = issue.key
	jiraLog.info("Issue ${currentIssueKey} received")
}
Working with issues
There is a important difference between working with the issues collection as smart value and working with it in Groovy scripts.
When working with it as smart value, the Automation for Jira app wraps the issues items with "smart beans". Smart beans provide a few convenience fields for the issues which you can use in smart value expressions.
In Groovy scripts, however, issues is a collection of standard Issue instances. Therefore, you cannot use the convenience fields.
For example, you cannot use the convenience field issue.url in Groovy. (In this specific case, jiraHelper.getIssueUrl(issue) is the perfect replacement.)
Working with smart values
You can absolutely access all smart values in the Groovy script, although not with the curly-brace syntax. Although the expression {{foo.bar}} works in action parameters, it is not a valid syntax in Groovy.
Working with DevOps smart values
DevOps smart values are accessible through the devops variable:
def currentCommitMessage = devops.commit.message
See the complete list of the DevOps smart values.
Note that the Groovy variables also include the dynamic ones that are converted from the parameters of the triggering Genius Command! For example, if you use the "Log work" command, which supports two parameters, the following Groovy variables will also be available: devops.command, devops.duration and devops.comment.
Working with built-in smart values
To access the built-in smart values, you can easily render the curly-brace syntax to an actual value using the ruleContext.renderSmartValues() method:
def now = ruleContext.renderSmartValues("{{now}}") // datetime value as string
def command = ruleContext.renderSmartValues("{{devops.command}}") // string value
See the complete list of the built-in smart values.
Calculating smart values for other actions and conditions in Groovy
If you want to pass smart values from the script to subsequent components in the automation rule, just return those in a map data structure. Conditions and actions can access those in any later point of the rule execution. This capability makes the Run Groovy script action super-useful to pre-calculate smart values!
For example, you can create new smart values simply like:
// make "lorem" available as {{devops.foo}} and "123" as {{devops.bar}}
return [foo: "lorem", bar: 123]
You can overwrite existing smart values, too. For example, append a string to the comment text originally received from the trigger like this:
return [comment: devops.comment + " (by Better DevOps Automation for Jira)"]
Notes:
- The items in the returned map must be serializable.
- The "devops" map cannot be modified directly. If the script tries to do that, the rule execution will fail with an UnsupportedOperationException error.
-
For security reasons, changes to the following variables are silently ignored:
- devops.actor
- devops.initiator
- devops.committerByUsername
- devops.committerByEmailAddress
Working example
Let's say that you have two Number type custom fields: Foo (with id=10123) and Bar (with id=10456). When an issue is updated, you want to send an email with the sum of the two fields, but only if that's greater than the threshold of 10.
Steps:
- Login to Jira as admin, go to Administration → System → Automation rules.
- Go to Administration → System → Automation rules.
- Click Create rule.
- Select the trigger Issue updated (from the Issue triggers category).
- Click Save.
- Click New action.
- Select the action Run Groovy script.
- Enter "Calculate sum" to the Description field.
-
Enter this Groovy script:
import com.atlassian.jira.component.ComponentAccessor

def customFieldManager = ComponentAccessor.customFieldManager

def issue = issues.get(0)

def fooCustomField = customFieldManager.getCustomFieldObject("customfield_10123")
def barCustomField = customFieldManager.getCustomFieldObject("customfield_10456")

def fooValue = issue.getCustomFieldValue(fooCustomField)
def barValue = issue.getCustomFieldValue(barCustomField)

// make the sum available as {{devops.fooBarValue}}
return [fooBarValue: fooValue + barValue]
- Click Save.
- Click Add component and select New condition.
- Select the condition Advanced compare condition.
- Enter {{devops.fooBarValue}} to the First value field.
- Choose the greater than option from the Condition dropdown.
- Enter "10" to the Second value field.
- Click Save.
- Click New action.
- Select the action Send email.
- Choose a recipient group or enter the addresses manually.
-
Enter the following subject:
Threshold breached!
-
Enter the following content (a very simple template you can easily customize to your needs):
Sum of Foo and Bar custom fields: {{devops.fooBarValue}}.
- Click Save.
- Name your automation rule intuitively, and click Turn it on.
Note that the purpose of this example is just to demonstrate the concept. You can easily build complex calculations in Groovy for your own use case.
Working with the rule context
You can use the ruleContext variable to work with the context of the automation rule being executed. It helps you to:
- access the configuration of the rule
- access the components of the rule
- render smart value expressions to their actual values (string type)
Useful properties:
def triggerType = ruleContext.ruleConfigBean.trigger.type // trigger type
def triggerValue = ruleContext.ruleConfigBean.trigger.value // trigger configuration
For the complete list of the properties, check the source code of RuleContext and RuleConfigBean.
Logging
Logging is a key tool for debugging your automation rule while it is being executed. There are two facilities available for logging with a slightly different purpose:
- Audit log: this facility is provided by the Automation for Jira app. It can be browsed through the web user interface by the rule owner. This should be your primary choice.
- Jira log: this facility is provided by Jira. It is written to the main Jira logfile. (Therefore, it requires access to the server filesystem which makes it less practical.)
See the next sections for usage.
Writing to the audit log
The auditLog variable offers an easy way to write log entries to the audit log.
Method reference:
import com.codebarrel.automation.api.thirdparty.audit.AuditItemAssociatedType

// write messages with different severities
auditLog.info(Object message)
auditLog.error(Object message)

// associate entities with the log entry
auditLog.addAssociatedIssue(Issue issue)
auditLog.addAssociatedProject(Project project)
auditLog.addAssociatedUser(ApplicationUser user)

// associate general entities with the log entry
auditLog.addAssociatedItem(AuditItemAssociatedType type, String itemId, String itemLabel)
Values of the AuditItemAssociatedType type are listed here.
Example:
auditLog.info("Hello ${devops.actor.name}!")
Note: if you write the same line multiple times to the log, only a single entry will appear. (It's a bit unexpected, but this is how Automation for Jira works.)
Writing to the Jira log
The jiraLog variable offers an easy way to write log entries to the Jira log.
It is a regular Log4j Logger instance. Example:
jiraLog.error("Hello ${devops.actor.name}!")
Important: do not forget to configure the logging level for the "com.midori.jira.plugin.devopsautomation.action" Java package, otherwise your DEBUG-level log entries may not be visible!
Advanced topics
Scripts in bulk vs. concurrent execution
The same Groovy script can support both execution modes if you pay attention to one detail: always iterate over the devops.issues collection for the input issues.
Doing so, your Groovy script will work reliably in any execution mode and with any trigger.
Classloading
By default, all classes that are available for the Better DevOps Automation app's internals are available for the Groovy scripts, too. It means that the majority of the Jira classes and services can be used without any configuration.
But, if your script wants to use classes from another Jira app (typically when your script implements an integration with that app), you have to add the @PluginClassLoader annotation to the script. Parametrizing it with the other app's app key enables the Groovy runtime to load classes also from that app:
@PluginClassLoader("com.atlassian.streams.streams-thirdparty-plugin") // Jira Activity Stream app
@PluginClassLoader("com.almworks.jira.structure") // Structure app
@PluginClassLoader("is.origo.jira.tempo-plugin") // Tempo Timesheets app

// ...now you can freely import classes also from these apps:

import com.atlassian.jira.component.ComponentAccessor
import com.atlassian.streams.api.UserProfile
import com.atlassian.streams.thirdparty.ActivityServiceDelegator
import com.almworks.jira.structure.api.StructureComponents
import com.tempoplugin.worklog.v4.services.WorklogService
Note that under the hood it is not a regular annotation, it does not need be imported, it can only be used in the beginning of the script, and it does not support multiple app keys.
Sometimes you need to pull in a module implementation from another app by its interface. For that, just import the interface, then get the module implementation with classHelper.getPluginModule():
@PluginClassLoader("is.origo.jira.tempo-plugin")

import com.tempoplugin.worklog.v4.rest.InputWorklogsFactory
import com.tempoplugin.worklog.v4.services.WorklogService

def worklogService = classHelper.getPluginModule(WorklogService)
def inputWorklogsFactory = classHelper.getPluginModule(InputWorklogsFactory)
It's really that simple!
For the reference, here are the method signatures offered by classHelper:
/**
 * Returns all plugin modules that implement or extend a specific class.
 */
List<T> getPluginModules(Class<T> clazz)

/**
 * Returns a single plugin module that implements or extends a specific class.
 */
T getPluginModule(Class<T> clazz)
Limiting running time
Be careful with creating scripts that may run for a very long time or may end up in an infinite loop. Although the Automation for Jira app enforces general service limits to automation rules, the Run Groovy script action itself does not introduce additional limits.
To have a limit on the running duration, annotate your script by adding the @TimedInterrupt annotation. For example, this script with an infinite loop will time out after 5 seconds:
import groovy.transform.TimedInterrupt
import java.util.concurrent.TimeUnit

@TimedInterrupt(value = 5L, unit = TimeUnit.SECONDS)
def i = true
auditLog.info("Started...")
while (i) {
  // generates CPU load and never ends
}
auditLog.info("Completed")
If you try to run it, it will never complete. Instead, it will be terminated and there will be a new entry added to the audit log with the "FAILURE" status and the "TimeoutException: Execution timed out after 5 seconds." message.
Re-using ScriptRunner scripts
The Adaptavist Library is a large collection of Groovy scripts that were developed for their popular ScriptRunner for Jira app. Most of these can be simply copied to the Run Groovy Script action and they will work without any changes. In other cases, you need to make smaller adjustments on the script to make it work with the automation action.
To help with this, we collected the most important differences below. We also give guides to convert a ScriptRunner expression to its equivalent expression for the automation action.
For obvious reasons, it is not a comprehensive list. If you need further help, please ask us any time.
| Expression for ScriptRunner | Equivalent expression for the Run Groovy script automation action |
|---|---|
| @WithPlugin(...) |
@PluginClassLoader(...) To make classloading work from third-party apps:
|
| @PluginModule FooService fooService |
FooService fooService = classHelper.getPluginModule(FooService) To access an instance of a component or service class:
|
| issue |
issues.get(0) (or iteration!) Many ScriptRunner scripts receive a single issue object as input. In contrary, the automation action receives a collection called issues, even if there may be only one item in it. Therefore, the strict equivalent would be getting the first issue from the collection with issues.get(0). But, you can also consider refactoring a script to iterate over issues and apply the logic to the current item. It would be a better conversion as it would work with any number of input issues: zero, one or more. |
| fooCollection.findByName(...) |
fooCollection.find { it.name == ... } findByName() is a convenience method that ScriptRunner provides for collections. In the automation action, use a find closure for the same purpose. |
| log |
You actually have 3 options for logging:
|
Generally, if you encounter class loading problems, add this to the top of the script:
@PluginClassLoader("com.onresolve.jira.groovy.groovyrunner")
Questions?
Ask us any time.