In this page
Why better than "Smart Commits"?
Commands
Anatomy of a command
Defining the command name
Defining the command parameters
Using the command parameter values
Default value for command parameters
Enforcing correct command parameters
More on regular expressions
Defining the command logic
No-code commands vs. low-code commands
Managing commands
Default commands
Creating commands
Updating commands
Deleting commands
Resetting commands
Permissions
Using Genius Commits
Multiple issue keys in the commit message
Multiple commands in the commit message
Multiple commands and multiple keys in the commit message
What are Genius Commits?
Genius Commits allow committers to execute automated processes by writing commands to their Git, Subversion and Mercurial commit messages:
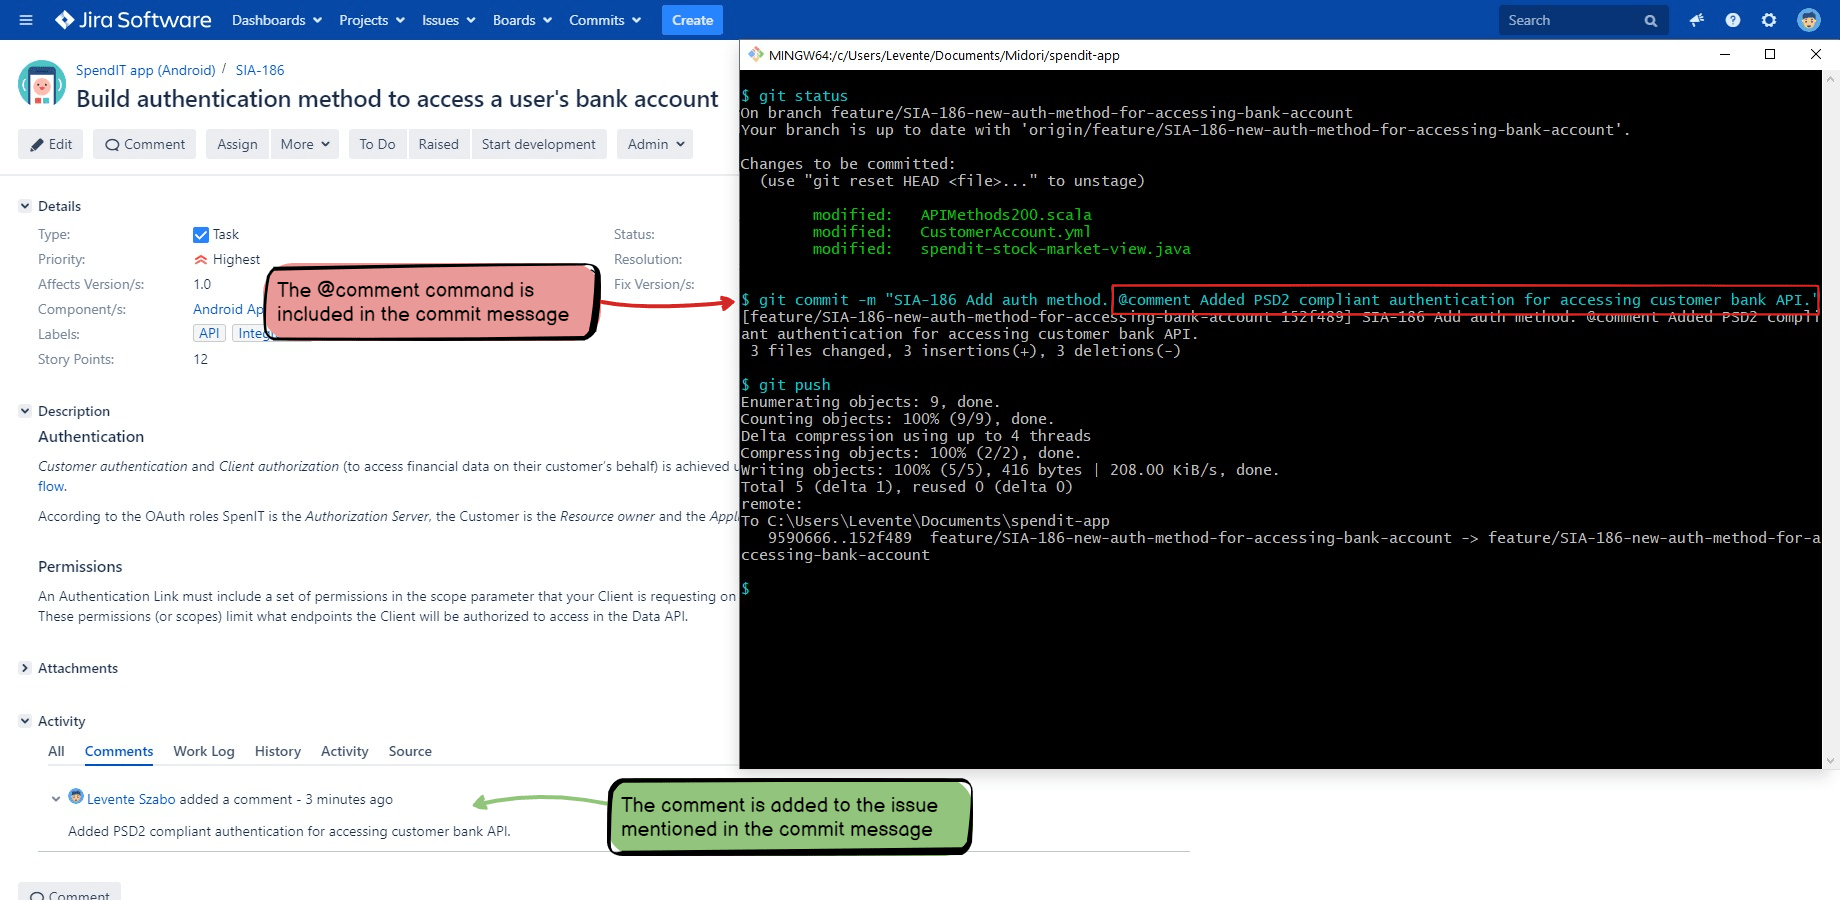
For example, a commit message like this will add a comment and update the status of the issue linked to the commit:
Fix the FOO-1 bug. @comment Bug fixed! @status Done
The logic behind the actions are implemented as no-code or low-code automation rules. Therefore, actions can do anything an automation rule can do, such as working with issues, logging work, sending notifications, starting CI builds, deploying code, running scripts and many more!
Genius Commits is an extremely configurable and extremely powerful concept. It puts an easy-to-use tool to the hands of your developers, who can use it transparently integrated to their natural developer workflows. They just fire a command through a commit sent to the Version Control System and while it starts a complex automation process in the background, the complexity remains hidden from the developer.
Why better than "Smart Commits"?
The concept of the Genius Commits may look similar to the Smart Commits in Bitbucket, but as the name implies, Genius Commits are much smarter than Smart Commits! The fundamental difference is that while Smart Commits rely on a small set of hard-wired commands, Genius Commits rely on any number of customizable commands that start customizable automations using the dedicated Genius Commit Created trigger:
Quick comparison:
| Genius Commits | Smart Commits | |
|---|---|---|
| Number of commands |
Any number. (You can use the default ones and create new ones.) |
A couple. (Fixed.) |
| Command name | Customizable. | Hardwired. |
| Command parameters |
Customizable. (Parameter name, type and requiredness is expressed through regular expressions.) |
Hardwired. |
| Command logic |
Customizable. (You can build no-code commands from configurable blocks or low-code commands with Groovy scripts.) |
Hardwired. |
| Command complexity |
Commands can do more than one thing, use conditions, iterations, etc. (E.g. "@deploy" can transition the issues to "Done", deploy the code to production, and send an email to the team.) |
Simple, single-purpose utility commands. |
| Syntax |
Commands can span more than one line. (E.g. multi-line comment text is supported.) |
Commands must be in one line. (It's a problem with longer command parameters.) |
Commands
Commands are short words prefixed with the @ symbol that you can include in the commit messages to trigger automation rules. They can accept parameters.
Examples:
@deploy										## deploys the code to an instance (no parameter)
@comment Bug fixed!							## comments on issue (one parameter)
@time 2h 30m I investigated the root cause. ## logs work on issue (two parameters)
Commands offer an extremely flexible form of automation, because:
- You can customize the command name (e.g. @deploy).
- You can customize the command parameters (e.g. an optional target instance name, either "prod" or "dev").
- You can customize the command logic (e.g. run a CI/CD plan that deploys the artifacts to the selected instance.)
After configuring the commands:
- Your developers can use zero, one or multiple commands in a commit.
- Your developers can use each command on zero, one or multiple issues.
Please read on, the following section will explain the details.
Anatomy of a command
Every command has the following attributes:
- Name
- Parameters
- Description
- Logic
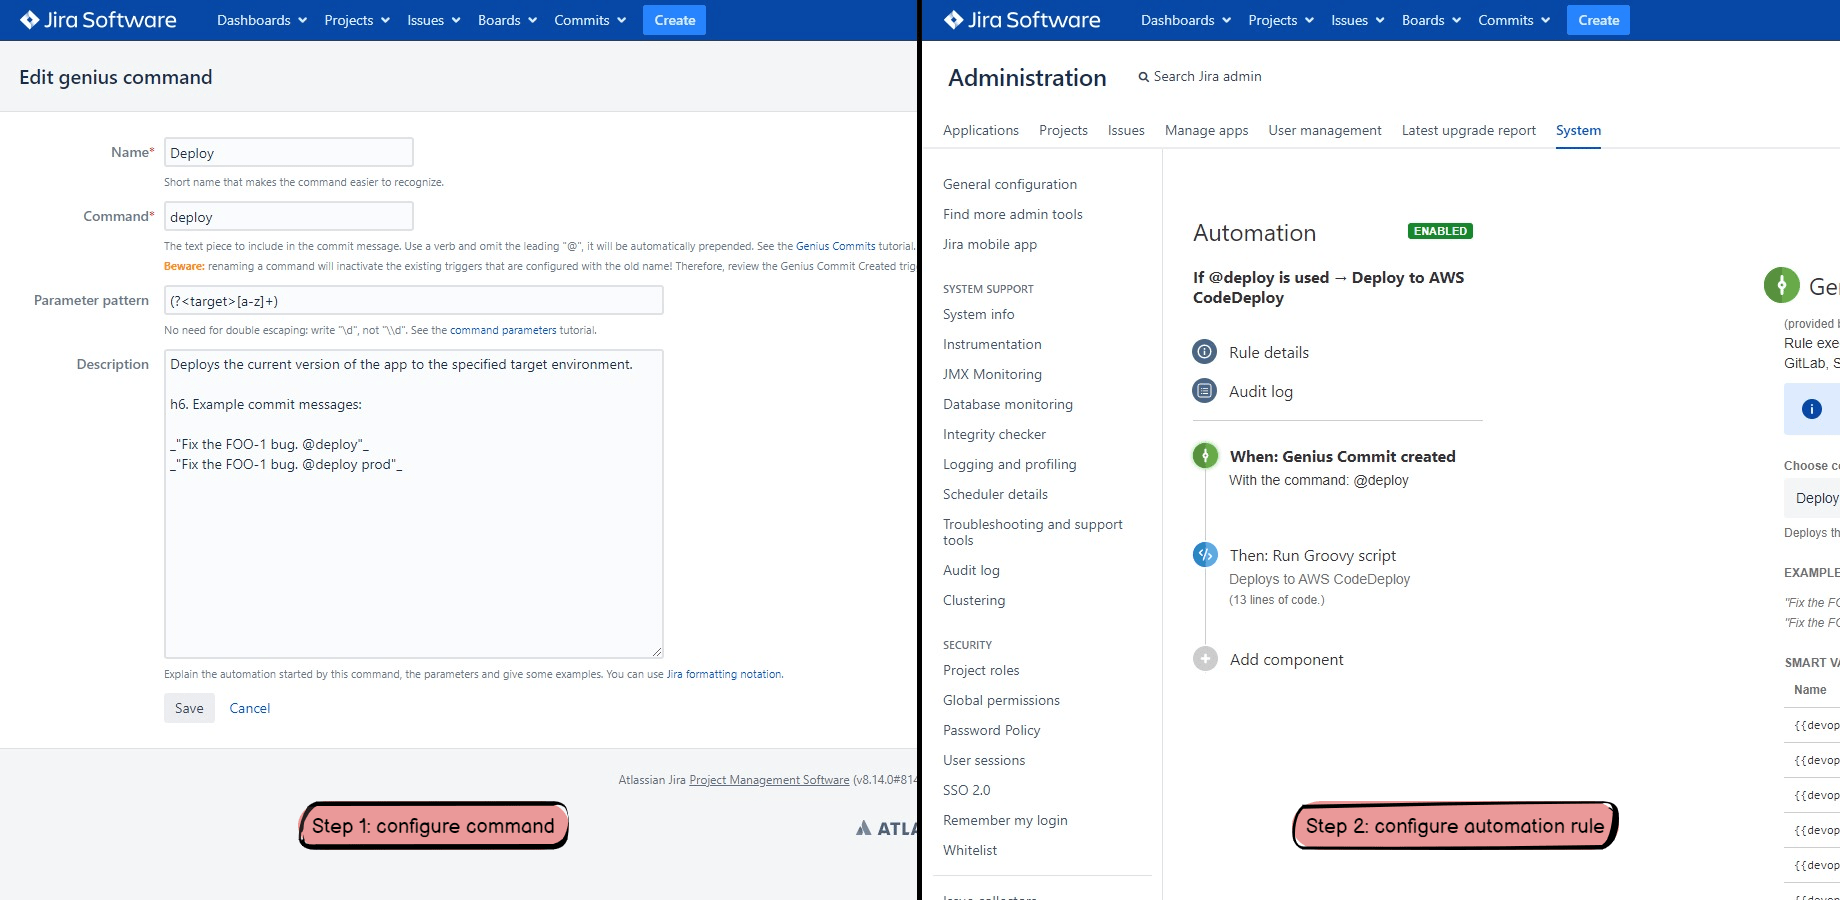
You can define the command name, parameters and description in one step, then the command logic in a second step by creating an automation logic for the command:
Learn more about defining the command attributes in the following sections.
Defining the command name
Although you have complete freedom when choosing the command name, it is recommended to a choose short and intuitive verb (or noun) that makes the command's purpose clear. Doing so, it will be easier for the developers to remember and use it.
Don't forget that because commands are added to commit messages, which themselves are immutable, the command name should be intuitive even years later when someone is inspecting the changes on the code and even for someone who is relatively new to the code. Therefore, choose a self-explanatory and intuitive verb.
For example, @deploy is good choice, while @dly is not.
Note that, strictly speaking, the leading @ character is not part of the name. It is just a syntax element that is primarily used to make commands more recognizable in commit messages.
Defining the command parameters
Commands can have zero, one or more parameters. Parameters can define their names. Parameters can be optional or required. Parameters can enforce their format.
For example, you can define the command @deploy that requires the parameter target which can only be one of dev or prod. Other values are not allowed and cause the command fail.
The parameter's name, optionality and format are all defined by the command's so-called parameter pattern. It can be edited as part of the command definition. It is a standard Java regular expression (regex) which is matched to that part of the commit message which follows the command.
How to express the various attributes of the parameter by the regex?
Basically, each parameter is represented by a named capturing group in the regex:
- Parameter name: the name of the capturing group in the regex is the parameter name.
- Parameter optionality: if the capturing group requires one match, then the parameter is effectively required. If it also allows zero matches, then the parameter is optional.
- Parameter format: the capturing group enforces the format by simply not matching unless the parameter value is entered in the expected format. For example, if it matches a single digit, then it effectively enforces an integer between 0 and 9. Or, if it matches a series of lower letters without whitespace, then it effectively enforces texts like "dev".
Let's see an example! If the command @deploy has the parameter pattern:
(?<target>[a-z]+)
...it means that the command requires a single parameter called "target" and it can contain lowercase letters only (the name of a fictional deployment target instance).
Then, it will successfully match the part after "@deploy" in this commit message:
Upgrade the JVM version. @deploy dev
...and as a result "target" will have the value "dev".
In contrary, it will not match anything in this commit message (the pattern does not match "123"!):
Upgrade the JVM version. @deploy 123
...and the parameter parser will raise an error, because the regex would require exactly one match.
Here is a slightly more complicated example with two parameters:
(?<target>[a-z]+)(?:\s+(?<tag>[A-Za-z0-9]*))?
This parameter pattern defines a required parameter "target" (lowercase letters) and an optional parameter "tag" (letters and numbers). The @deploy command configured with this pattern could not only specify the target instance, but also an additional piece of text to tag the deployment with:
Upgrade the JVM version. @deploy dev jvmupgrade
Overall, using precise regexes will make your commands smart and bullet-proof.
Using the command parameter values
How to use the command parameter value in the automation rule after it has been parsed?
Each command parameter is automatically transformed to a smart value using a simple rule: if the parameter is named foo, its value will be available through the smart value named {{devops.foo}}. In the example above, the value will be available as {{devops.target}}.
As it is a standard smart value, you can:
- Pass it to other automation rule components (like conditions and actions) that support smart values, using the curly-brace syntax {{devops.target}}.
- Pass it to the Run Groovy script action and access its value in the Groovy script.
Default value for command parameters
For optional parameters, it is possible to provide a default value using a simple smart value expression. For example, you may want to make "target" optional and use "dev" when the value is not specified in the commit message.
For this, define "target" as optional in the regex:
(?<target>[a-z]+)?
Then use the getOrDefaultValue() method in the configuration parameter of the action:
{{stringHelper.getOrDefault(devops.target, "dev")}}
The method checks if the first argument has any value, and if it has, then that value is returned, otherwise the second argument is returned. Effectively, the second argument is the default value for the first argument!
Enforcing correct command parameters
This section explains a technique to avoid commands incorrectly entered to the commit message. Although using this technique is optional, we strongly suggest so.
The starting point is that, due to the asynchronous execution of automation rules, command parameters are parsed "late" in the process.
Let's assume that a command was incorrectly entered to the commit message because a required parameter was missing. When the commit is pushed, the command parameter parser will detect the error and the rule will not be executed.
Although it works as expected, detecting these errors "late" has the following consequences:
-
The error is detected only after the commit was already pushed to the target repository.
There is no way to add the missing parameter at this point.
(Modifying an already pushed and published commit can lead to major problems. Alternatively, you can create another commit with the correct command, but it will pollute the repository history with a dummy change.) -
The error is displayed only in the automation rule's audit log.
The developer who pushed the incorrect commit does not receive an immediate error message.
(It is a consequence of the asynchronous execution model.)
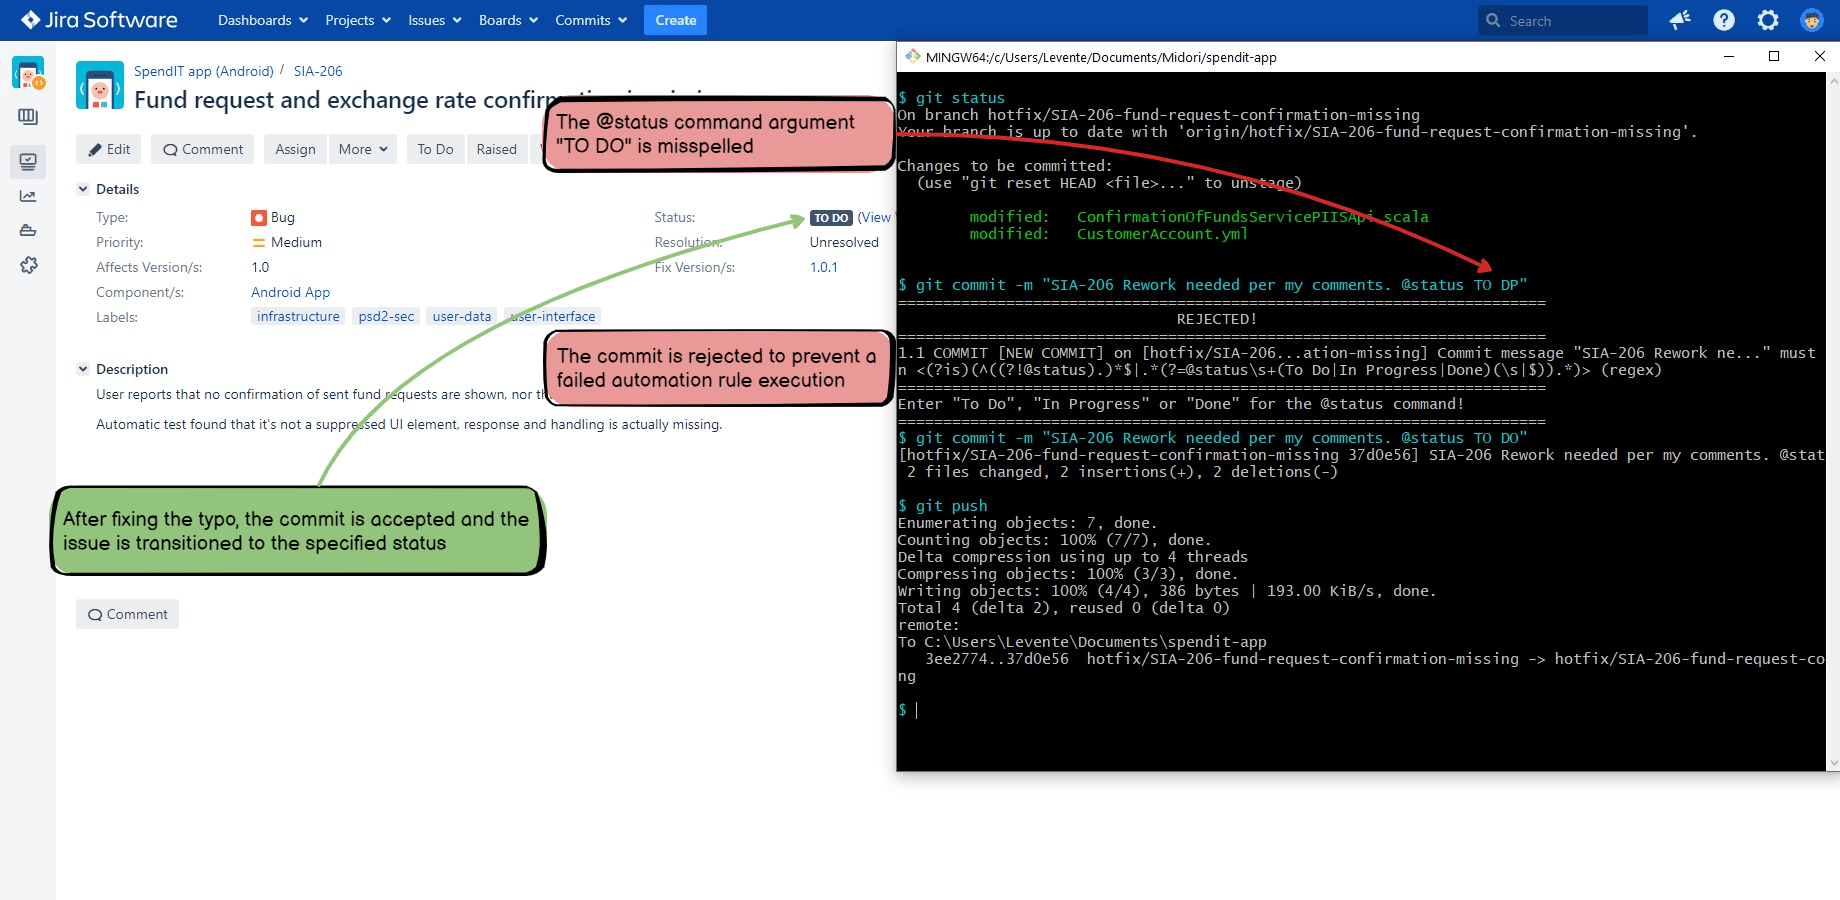
The solution is using the commit policy to reject the incorrect commits before those are even created!
For this, edit the commit policy you're already using:
- Go to the Commits menu in the Jira header → Commit Policies.
- Click the commit policy.
- Add a new commit rule.
- Add the Commit message must match a pattern condition to the rule.
-
Enter this regular expression for the condition:
(?is)(^((?!@status).)*$|.*(?=@status\s+(To Do|In Progress|Done)(\s|$)).*)
How does it work? This condition will accept the commit only if the commit message does not contain the @status command, or if it does followed by one of the status names "To Do", "In Progress" or "Done" case-insensitively. Other commits cannot even be created locally! Even better, you can display a customizable rejection message for the developer:
Based on this recipe, you can introduce a condition with a custom regular expression for each command. With that commit policy in place, your developers will not enter incorrect commands anymore!
Note: although this syntactical validation eliminates incorrectly entered commands, it does not eliminate semantical problems, like a disallowed workflow transition.
More on regular expressions
This section offers links to learn more about regular expressions that are used to configure command parameters.
Regular expressions (regex) are powerful for matching patterns in text. If you are new to regex, you can begin here:
- Regex tutorial (quick cheatsheet by examples)
- RegexOne (interactive exercises)
- Regular expression (Wikipedia article) (thorough but dense for a first read)
Regex comes in several dialects. Better DevOps Automation relies on the Java-style dialect. To be sure your expressions work as expected, test and validate them with RegexPlanet.
Defining the command logic
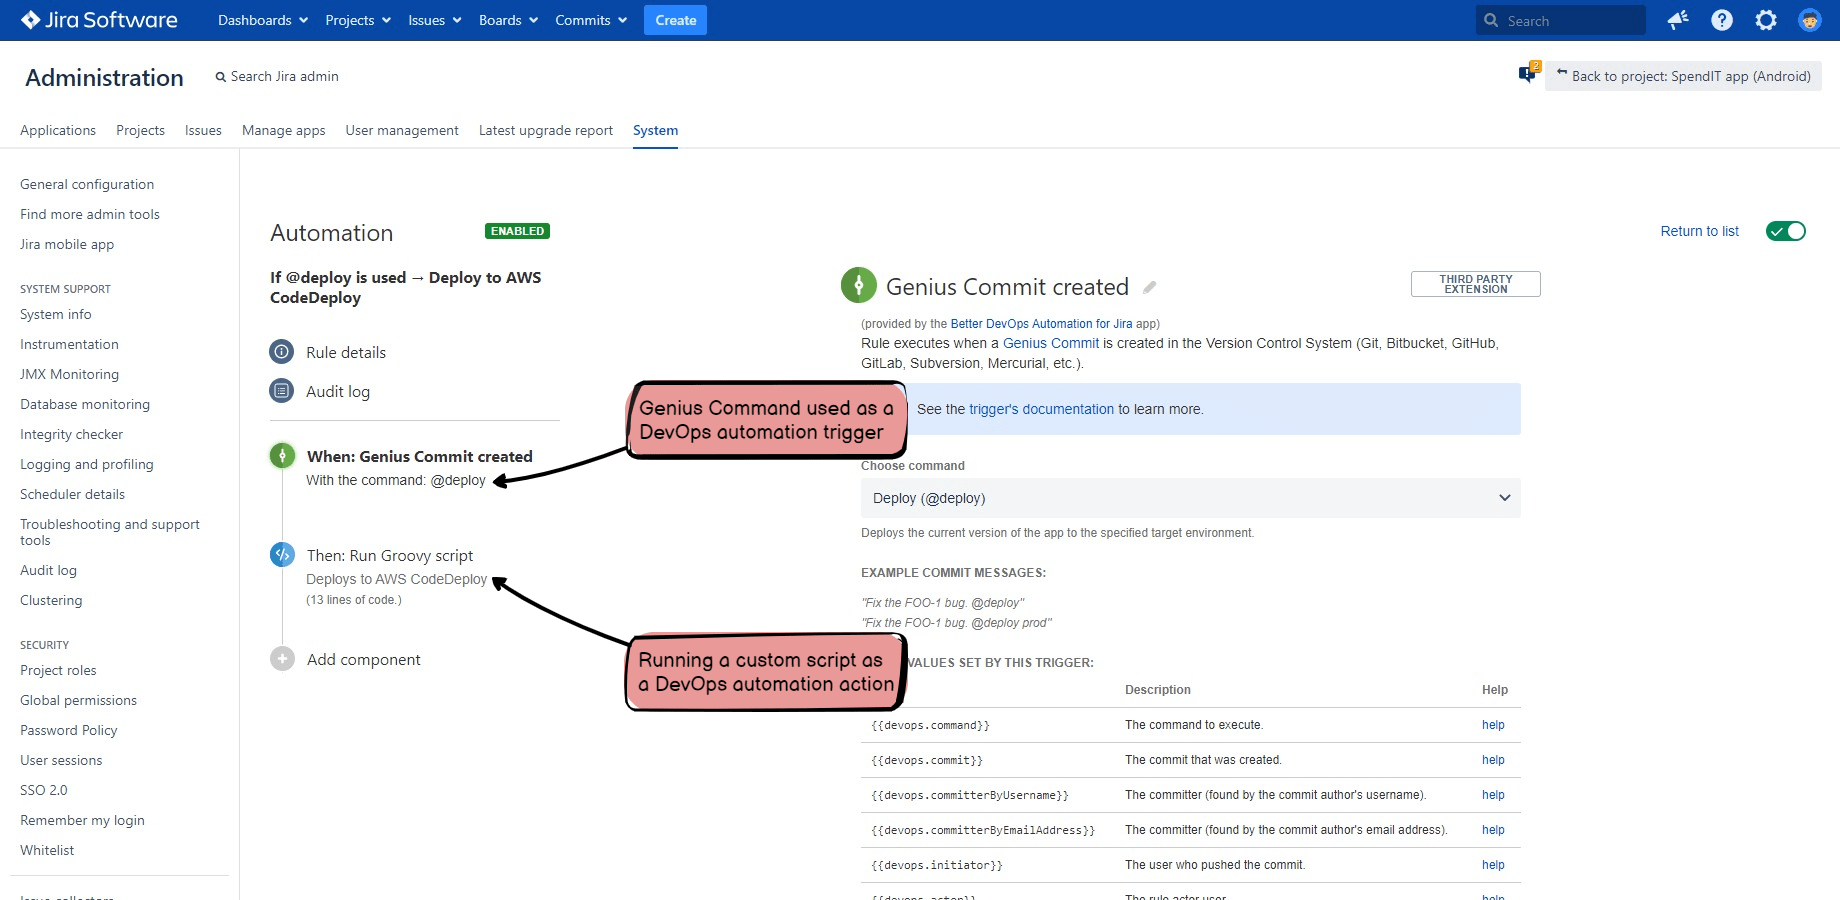
The command logic ("what the command does") is expressed by the automation rule that is started by the command.
To implement the automation rule that handles the command:
- Create a new automation rule.
- Select the Genius Commit created trigger.
- At the trigger configuration, select the command for which you want define the logic.
- Build the rule using conditions, actions, etc.
Note that what you do in step 4 is the command logic itself.
No-code commands vs. low-code commands
You have a wide selection of easily configurable rule components (conditions and actions). We suggest to try to build the logic with these first. If these are sufficient for your use case, you have a no-code command!
When those are not sufficient or you want more control and flexibility, use the Run Groovy script action with a purpose-written script. Now you have a low-code command!
The trade-off is simple: scripts give you much more power, scripts can do literally anything, at the cost of some programming.
Managing commands
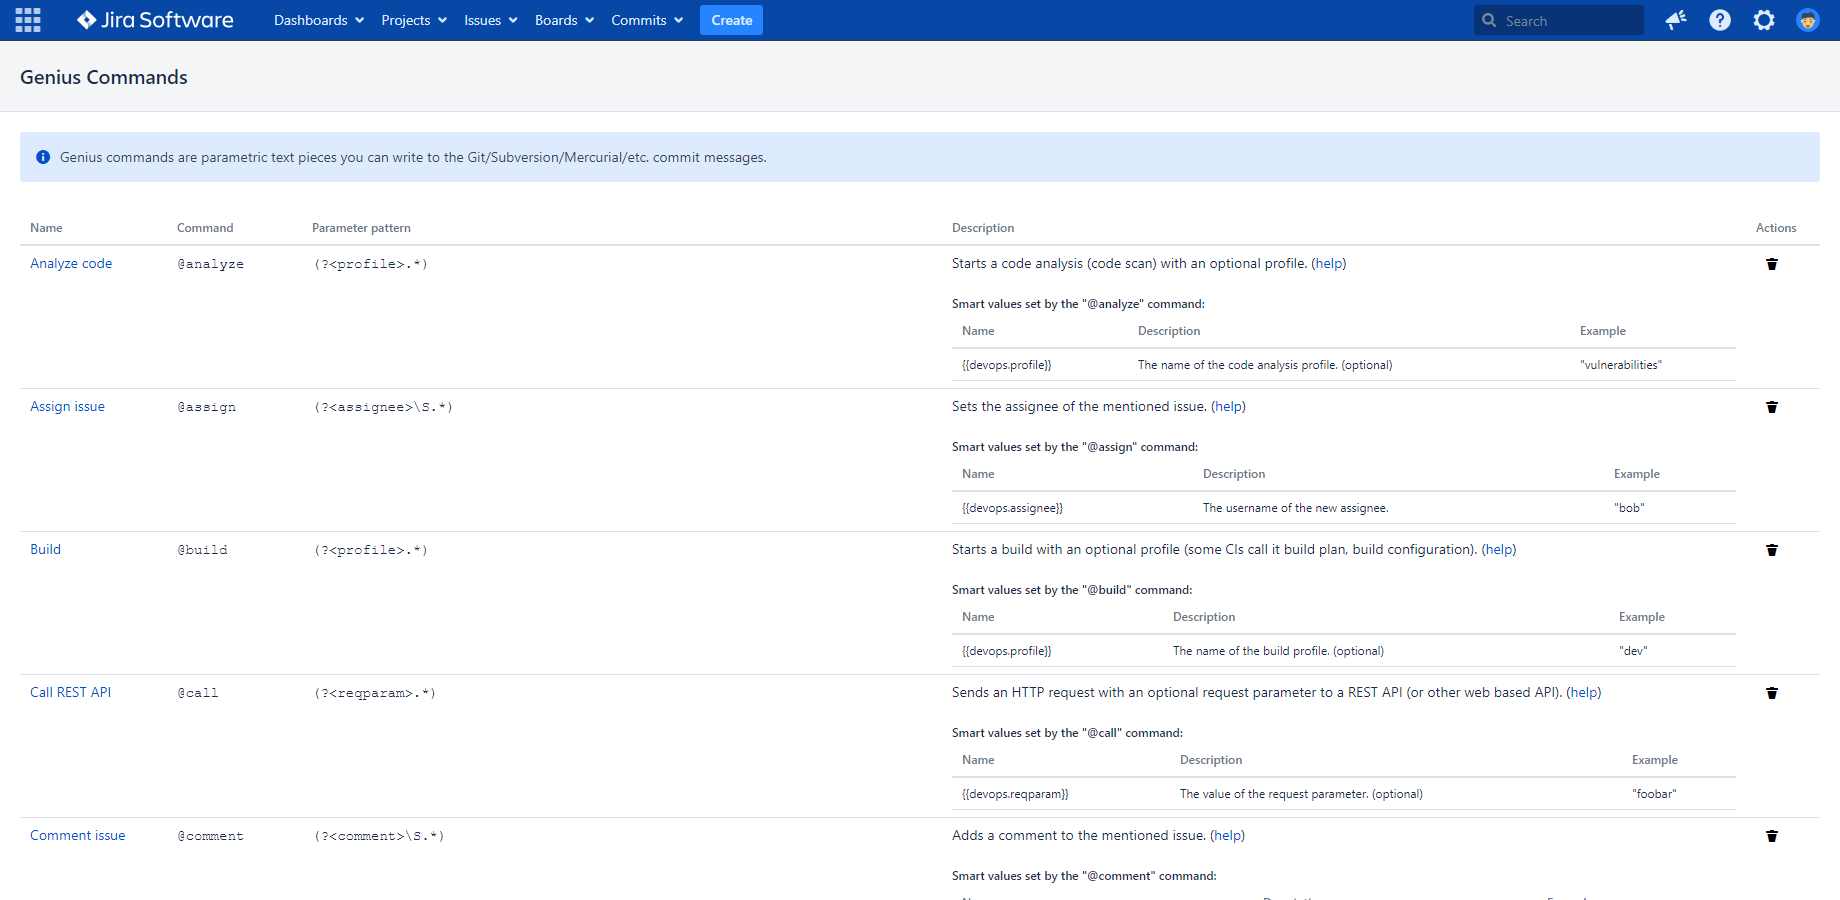
To add, modify or delete commands, login to Jira as administrator → open the Commits menu in Jira's header → click Genius Commands.
Default commands
When you install the app, the following commands will be created:
- @affectsversion: Sets the affects versions of an issue. See the configuration guide.
- @analyze: Starts a code analysis (code scan). See the configuration guide.
- @assign: Assigns issue to a user. See the configuration guide.
- @build: Triggers a build in the CI/CD system. See the configuration guide.
- @call: Sends an HTTP request to a (REST) API. See the configuration guide.
- @comment: Comments on an issue. See the configuration guide.
- @fixversion: Sets the fix versions of an issue. See the configuration guide.
- @issuetype: Sets the issue type. See the configuration guide.
- @label: Sets the issue labels. See the configuration guide.
- @priority: Sets the issue priority. See the configuration guide.
- @run: Runs a script/program. See the configuration guide.
- @status: Sets the issue status (and resolution, optionally). See the configuration guide.
- @time: Logs work to an issue. See the configuration guide.
- @transition: Transitions an issue (and sets the resolution, optionally). See the configuration guide.
Creating commands
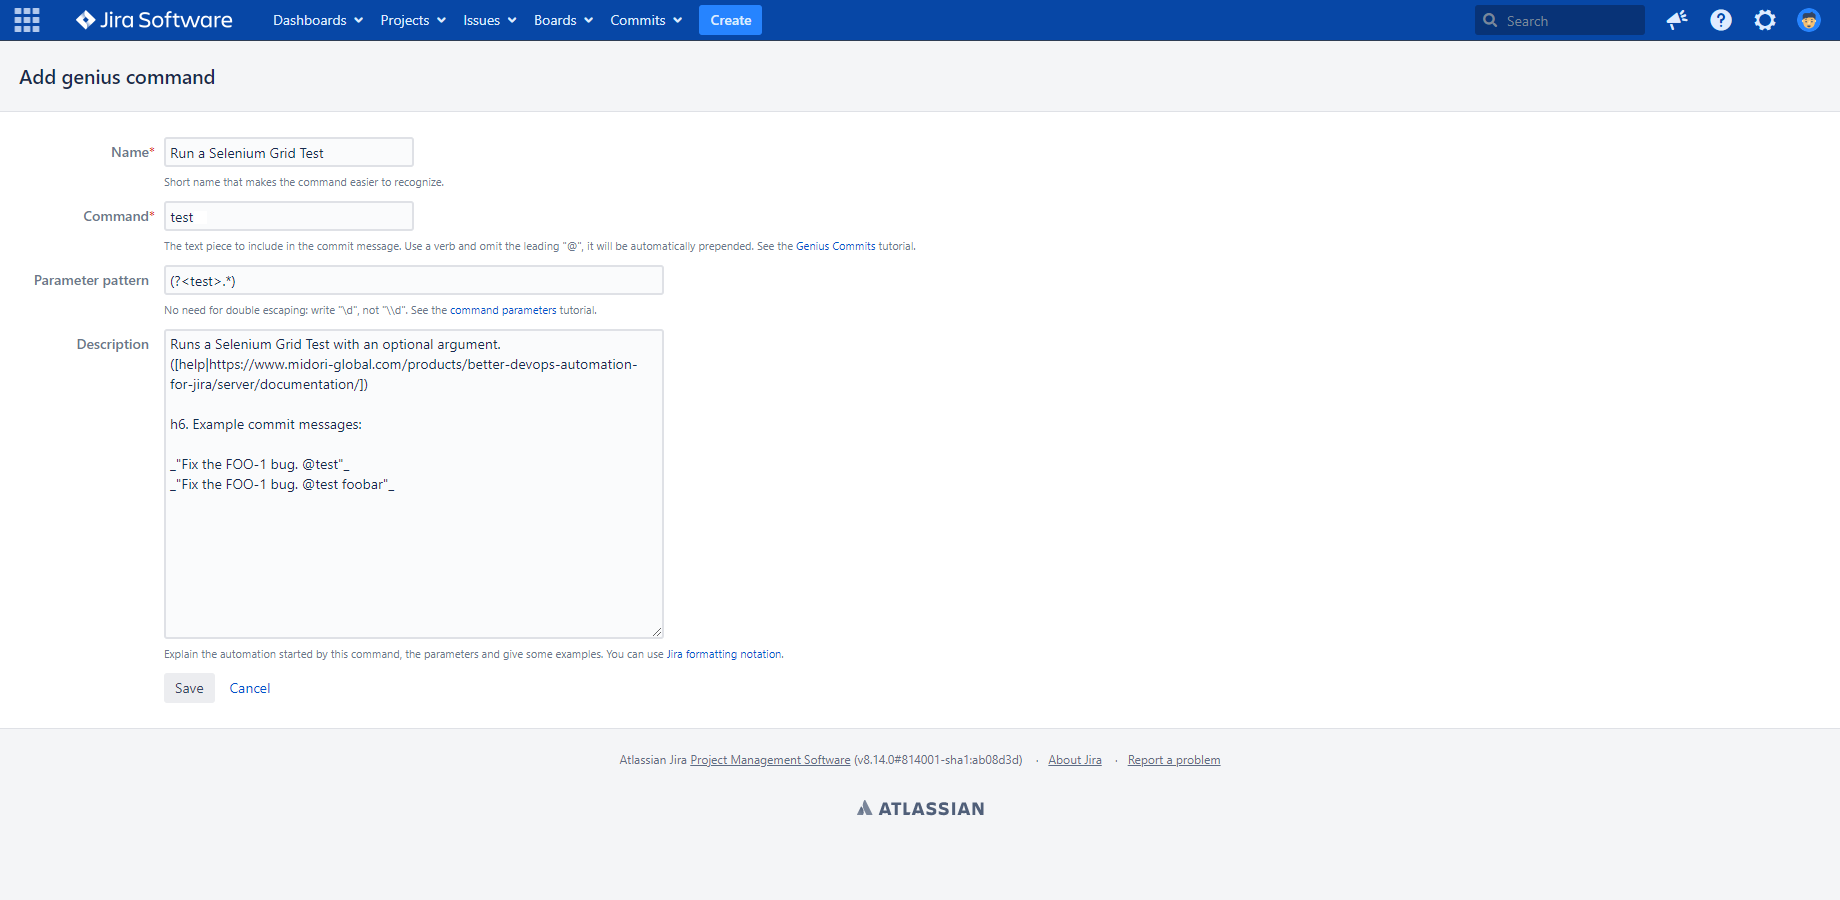
Click the Add command button under the command list to create a new command.
Each Genius Command has a name and command token, an optional parameter pattern and an optional description where you can typically explain the usage of the command (and which will appear in the trigger configuration screen).
Updating commands
You can edit a command any time by clicking the command name in the command list, making the needed changes and clicking the Save button.
Deleting commands
Commands can be deleted with a single click on the corresponding icons in the Actions column.
You must be careful with deleting commands though. You should always check if there's any Genius Commit Created trigger that is configured with the command before deleting the command. If you accidentally delete a command still in use, then those rules won't work anymore.
Resetting commands
You can restore the default commands by clicking the Reset to default button under the command list.
Warning: it will reset every command which means deleting the non-default commands!
Permissions
The security model around commands is simple:
-
Managing commands:
- Jira administrators can manage (add, update or delete) commands.
- Regular users can view commands (as a read-only list).
-
Defining command logic:
- The automation rules which implement the command logic can be global rules or project rules. Global rules can be managed by Jira administrators, while project rules can be managed by project administrators. For details, see the Automation for Jira documentation.
-
Using commands:
- Any developer who can create commits can enter commands to his commit messages. Therefore all developers can use Genius Commits.
- (It is possible to restrict a command to certain committers using conditions in the rule.)
Using Genius Commits
From the user's point of view, using Genius Commits is dead-simple: developers create commits with the commands and push those to the central repository just as they did before!
On the server-side, Better DevOps Automation will catch each commit that contains a command. It will parse and validate the command parameters, then execute the automation rules that are configured with that command.
The nicety is that there is no need to change anything in the regular developer workflow and there is really not much more to tell about the usage. You just have to set up the commands and the automation rule, then it just happens "magically" in the background.
Multiple issue keys in the commit message
When a commit message contains multiple issue keys, the automation action will be executed for each related issue, one by one. The execution order is not guaranteed.
Fix the FOO-1 and FOO-2 bugs. @comment Bug fixed!
In the example above, the "Bug fixed!" comment will be added to both FOO-1 and FOO-2.
This is intuitive for most automations, but not for all! For example, it may work unexpectedly with a command that logs the same work unwantedly to multiple issues.
Tip: if you want to reject the commits that mention multiple issues, just add the condition Commit message must contain issue keys from a JQL query with the "Exactly one issue" setting to your commit policy. It's really that simple!
Multiple commands in the commit message
When multiple commands are included in a commit message, the related rules will be executed separately and in parallel. The execution order is not guaranteed.
Fix the FOO-1 bug. @comment Bug fixed! @status Done
In the example above, the "Bug fixed!" comment will be added to FOO-1 and its status will be updated to "Done".
Multiple commands and multiple keys in the commit message
When multiple commands and multiple issue keys are included in a commit message, the related rules will be executed separately and in parallel, with the mentioned issues passed as input for both. The execution order is not guaranteed.
Fix the FOO-1 and FOO-2 bugs. @comment Bug fixed! @status Done
In the example above, the "Bug fixed!" comment will be added to both FOO-1 and FOO-2, and their status will be updated to "Done".
Questions?
Ask us any time.