In this page
Sending an HTTP request after every changeset
Configuration
Usage
Troubleshooting
Sending an HTTP request with a specific command
Configuration
Usage
Troubleshooting
Overview
HTTP requests provide a standard, powerful and simple way to send messages to an external server over the network. They can be used to update external applications, send real-time alerts to external consumers, trigger CI builds, or even deploy to the production server.
This technique is extremely universal, because it enables integrating any tool which offers a REST API to your automations! To name a few:
- Ansible REST API
- Bamboo REST API (also see the dedicated Bamboo page!)
- Bitbucket REST API
- Chef REST API
- Docker REST API
- GitHub REST API
- GitLab REST API
- Jira REST API
- Jenkins REST API
- Kubernetes REST API
- Microsoft Teams REST API
- Puppet REST API
- ServiceNow REST API
- Skype REST API
- Slack REST API (also see the dedicated Slack page!)
- TeamCity REST API (also see the dedicated TeamCity page!)
- Zoom REST API (also see the dedicated Zoom page!)
...and a lot more. Just check out the documentation of the tool you want to integrate with!
Sending an HTTP request after every changeset
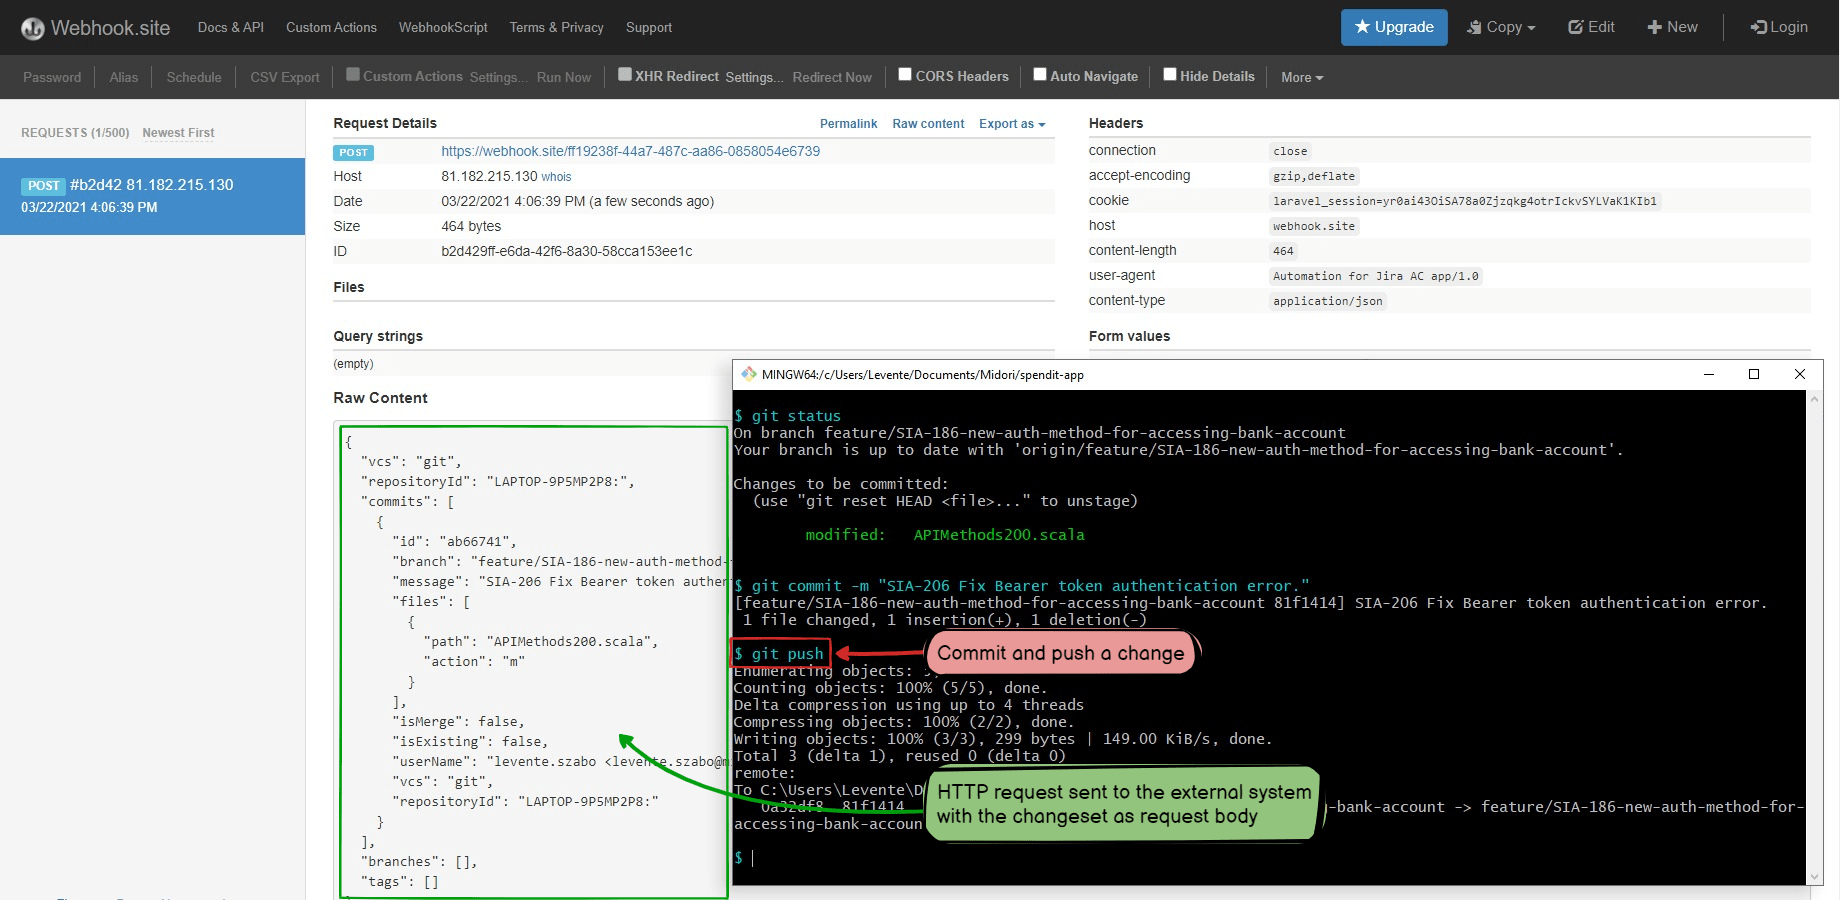
This automation sends an HTTP(S) request to a URL when a new changeset is received:
Configuration
This guide uses the a dead-simple webhook provided by the Webhook.site platform to explain the configuration steps. You can implement the automation for any HTTP request based on this guide, just use a different URL and request configuration settings.
-
Create the test webhook:
-
Open the Webhook.site page in your browser.
It will generate a unique test webhook for you, identified by a URL like this (shown at Your unique URL, you will need it later!):
https://webhook.site/47e0c9d2-7324-4995-b5b9-782185267e6d
- Keep the page open as you will see the incoming HTTP requests here later.
-
Open the Webhook.site page in your browser.
It will generate a unique test webhook for you, identified by a URL like this (shown at Your unique URL, you will need it later!):
-
Create the automation rule:
- Login to Jira as admin, go to Administration → System → Automation rules.
- Click Create rule.
- Select the trigger Changeset accepted (from the DevOps category).
- Click Save.
- Click New action.
- Select the action Send web request.
-
Enter the webhook URL:
https://webhook.site/47e0c9d2-7324-4995-b5b9-782185267e6d
Notes:- See the action's documentation for configuring the HTTP method, HTTP headers and the request body (payload).
-
Enter the webhook URL:
- Click Save.
- Name your automation rule intuitively, and click Turn it on.
Usage
-
Create a commit with this commit message:
Fix the FOO-1 bug.
- The HTTP request will be received and shown by the Webhook.site page.
Troubleshooting
If you don't get the expected results:
- See the general troubleshooting steps.
Sending an HTTP request with a specific command
This automation sends an HTTP(S) request to a URL, optionally parsing request parameters from the VCS commit message and passing those in the request.
Configuration
Note that the default command @call used in this guide doesn't have a concrete purpose. It was primarily designed to demonstrate how to send an HTTP request and to serve as a template for concrete commands.
After you understood how it works, you can customize it to a concrete use case by:
- Modifying its name (e.g. @review).
- Modifying its description (e.g. "Pass the user story to code review.").
- Modifying its parameter pattern (e.g. no parameters expected).
- Modifying its logic (e.g. transitioning the issue to "Waiting for review" and creating the pull request through the Bitbucket REST API).
This guide uses the a dead-simple webhook provided by the Webhook.site platform to explain the configuration steps. In the guide, a single number-type parameter foo is passed to the webhook to demonstrate using parameters. You can implement the automation for any HTTP request based on this guide, just use a different URL and request configuration settings.
-
Create the test webhook:
-
Open the Webhook.site page in your browser.
It will generate a unique test webhook for you, identified by a URL like this (shown at Your unique URL, you will need it later!):
https://webhook.site/47e0c9d2-7324-4995-b5b9-782185267e6d
- Keep the page open as you will see the incoming HTTP requests here later.
-
Open the Webhook.site page in your browser.
It will generate a unique test webhook for you, identified by a URL like this (shown at Your unique URL, you will need it later!):
-
Create the automation rule:
- Go to Administration → System → Automation rules.
- Click Create rule.
- Select the trigger Genius Commit created (from the DevOps category).
- Choose the command Call REST API, and click Save.
- Click New action.
- Select the action Send web request.
-
Enter the webhook URL and refer the parameter as {{devops.reqparam}}:
https://webhook.site/47e0c9d2-7324-4995-b5b9-782185267e6d?foo={{devops.reqparam.urlEncode}}Notes:- The request parameters in the URL should be URL-encoded with .urlEncode.
- See the action's documentation for configuring the HTTP method, HTTP headers and the request body (payload).
-
Enter the webhook URL and refer the parameter as {{devops.reqparam}}:
- Click Save.
- Name your automation rule intuitively, and click Turn it on.
Usage
-
Create a commit with this commit message:
Fix the FOO-1 bug. @call 123
- The HTTP request will be received with the foo=123 query parameter and shown by the Webhook.site page.
Troubleshooting
If you don't get the expected results:
- Check if the @call command is defined in the Genius Commands screen?
- Check if the @call command followed by the parameter was included in the commit message?
- See the general troubleshooting steps.
Questions?
Ask us any time.