In this page
Starting a TeamCity build after every changeset
Configuration
Usage
Troubleshooting
Starting a TeamCity build with a specific command
Configuration
Usage
Troubleshooting
Starting a TeamCity build with a specific command and build configuration ID
Configuration
Usage
Troubleshooting
Starting a TeamCity build with a specific command and build configuration parameter
Configuration
Usage
Troubleshooting
Overview
TeamCity is a build management and continuous integration server from JetBrains (the makers of IntelliJ IDEA and ReSharper).
Watch this short tutorial video about configuring TeamCity automations, then follow the step-by-step guides in the next sections:
Starting a TeamCity build after every changeset
This automation starts a TeamCity build when a new changeset is received.
It is the simplest way to integrate TeamCity to your DevOps pipeline. It starts the build once per changeset, after all the commits in the changeset are already in the repository.
Configuration
- Login to TeamCity as admin, go to your profile → My Settings & Tools → Access Tokens. If your TeamCity version does not support Access Tokens, continue with step 4.
- Click Create access token.
- Enter a token name in the Token name field. Copy the generated token, because it cannot be recovered in the future. Click Close.
- Login to Jira as admin, go to Administration → System → Automation rules.
- Click Create rule.
- Select the trigger Changeset accepted (from the DevOps category).
- Click Save.
- Click New action.
- Select the action Send web request.
- If you are using an older TeamCity version which does not support CSRF protection (or it's disabled), skip these steps and continue with step 12.
-
Enter the Webhook URL as:
<YOUR_TEAMCITY_SERVER_BASE_URL>/authenticationTest.html?csrf
Replace the placeholder with your actual TeamCity base URL. - Add a header with the name "Authorization" and with the value of "Bearer <YOUR_TEAMCITY_ACCESS_TOKEN>". Replace the placeholder with the actual Access Token created at step 2.
- Choose GET as HTTP method.
- Choose Empty as Webhook body.
- Check the Delay execution of subsequent rule actions until we've received a response for this webhook checkbox.
-
Validate your settings in the Validate your webhook configuration section below.
Tip: if the URL contains smart values (variables), replace those with actual values (constants) for the time of the validation, then revert to the smart values after the configuration was successfully validated.
- Click Save.
- Click New action.
- Select the action Send web request.
-
Enter the Webhook URL as:
<YOUR_TEAMCITY_SERVER_BASE_URL>/app/rest/latest/buildQueue
Replace the placeholder with your actual TeamCity base URL. -
Add a header with the name "Authorization" and with the value of "Bearer <YOUR_TEAMCITY_ACCESS_TOKEN>".
Replace the placeholder with the actual Access Token created in step 2.
(If your TeamCity version does not support Access Tokens, use basic authentication instead: Add a header with the name "Authorization" and with the value of Basic <CREDENTIALS> where credentials is the Base64 encoding of your TeamCity username and password joined by a single colon :.) -
If you executed step 9, add a header with the name "X-TC-CSRF-Token" and with the value of {{webhookResponse.body}}.
(For older TeamCity versions, add a header with the name "Origin" and with the value of your TeamCity base URL.) - Add a header with the name "Content-Type" and with the value "application/xml".
- Choose POST as HTTP method.
- Choose Custom data as Webhook body.
-
Enter the following data:
<build>
	<buildType id="BUILD_CONFIGURATION_ID"/>
</build>
Replace the actual value of your build configuration ID, located at your build settings in TeamCity. -
Validate your settings in the Validate your webhook configuration section below.
It will start a build if the configuration is valid.
Tip: if the URL contains smart values (variables), replace those with actual values (constants) for the time of the validation, then revert to the smart values after the configuration was successfully validated.
-
Enter the Webhook URL as:
- Click Save.
- Name your automation rule intuitively, and click Turn it on.
Usage
-
Create a commit with this commit message:
Fix the FOO-1 bug.
- The TeamCity build will be started.
Troubleshooting
If you don't get the expected results:
- See the general troubleshooting steps.
Starting a TeamCity build with a specific command
This automation starts a TeamCity build when the changeset includes a commit with a commit message that contains a certain command.
It is a more flexible variant of the previous automation, because you can control whether to start the build or not.
Configuration
- Login to TeamCity as admin, go to your profile → My Settings & Tools → Access Tokens. If your TeamCity version does not support Access Tokens, continue with step 4.
- Click Create access token.
- Enter a token name in the Token name field. Copy the generated token, because it cannot be recovered in the future. Click Close.
- Login to Jira as admin, go to Administration → System → Automation rules.
- Click Create rule.
- Select the trigger Genius Commit created (from the DevOps category).
- Choose the command Build, and click Save.
- Click New action.
- Select the action Send web request.
- If you are using an older TeamCity version which does not support CSRF protection (or it's disabled), skip these steps and continue with step 12.
-
Enter the Webhook URL as:
<YOUR_TEAMCITY_SERVER_BASE_URL>/authenticationTest.html?csrf
Replace the placeholder with your actual TeamCity base URL. - Add a header with the name "Authorization" and with the value of "Bearer <YOUR_TEAMCITY_ACCESS_TOKEN>". Replace the placeholder with the actual Access Token created at step 2.
- Choose GET as HTTP method.
- Choose Empty as Webhook body.
- Check the Delay execution of subsequent rule actions until we've received a response for this webhook checkbox.
-
Validate your settings in the Validate your webhook configuration section below.
Tip: if the URL contains smart values (variables), replace those with actual values (constants) for the time of the validation, then revert to the smart values after the configuration was successfully validated.
- Click Save.
- Click New action.
- Select the action Send web request.
-
Enter the Webhook URL as:
<YOUR_TEAMCITY_SERVER_BASE_URL>/app/rest/latest/buildQueue
Replace the placeholder with your actual TeamCity base URL. -
Add a header with the name "Authorization" and with the value of "Bearer <YOUR_TEAMCITY_ACCESS_TOKEN>".
Replace the placeholder with the actual Access Token created in step 2.
(If your TeamCity version does not support Access Tokens, use basic authentication instead: Add a header with the name "Authorization" and with the value of Basic <CREDENTIALS> where credentials is the Base64 encoding of your TeamCity username and password joined by a single colon :.) -
If you executed step 9, add a header with the name "X-TC-CSRF-Token" and with the value of {{webhookResponse.body}}.
(For older TeamCity versions, add a header with the name "Origin" and with the value of your TeamCity base URL.) - Add a header with the name "Content-Type" and with the value "application/xml".
- Choose POST as HTTP method.
- Choose Custom data as Webhook body.
-
Enter the following data:
<build>
	<buildType id="BUILD_CONFIGURATION_ID"/>
</build>
Replace the actual value of your build configuration ID, located at your build settings in TeamCity. -
Validate your settings in the Validate your webhook configuration section below.
It will start a build if the configuration is valid.
Tip: if the URL contains smart values (variables), replace those with actual values (constants) for the time of the validation, then revert to the smart values after the configuration was successfully validated.
-
Enter the Webhook URL as:
- Click Save.
- Name your automation rule intuitively, and click Turn it on.
Usage
-
Create a commit with this commit message:
Fix the FOO-1 bug. @build
- The TeamCity build will be started.
Troubleshooting
If you don't get the expected results:
- Check if the @build command is defined in the Genius Commands screen? (It's a default command.)
- Check if the @build command was included in the commit message?
- See the general troubleshooting steps.
Starting a TeamCity build with a specific command and build configuration ID
This automation starts a TeamCity build by parsing the build configuration ID from the VCS commit message:
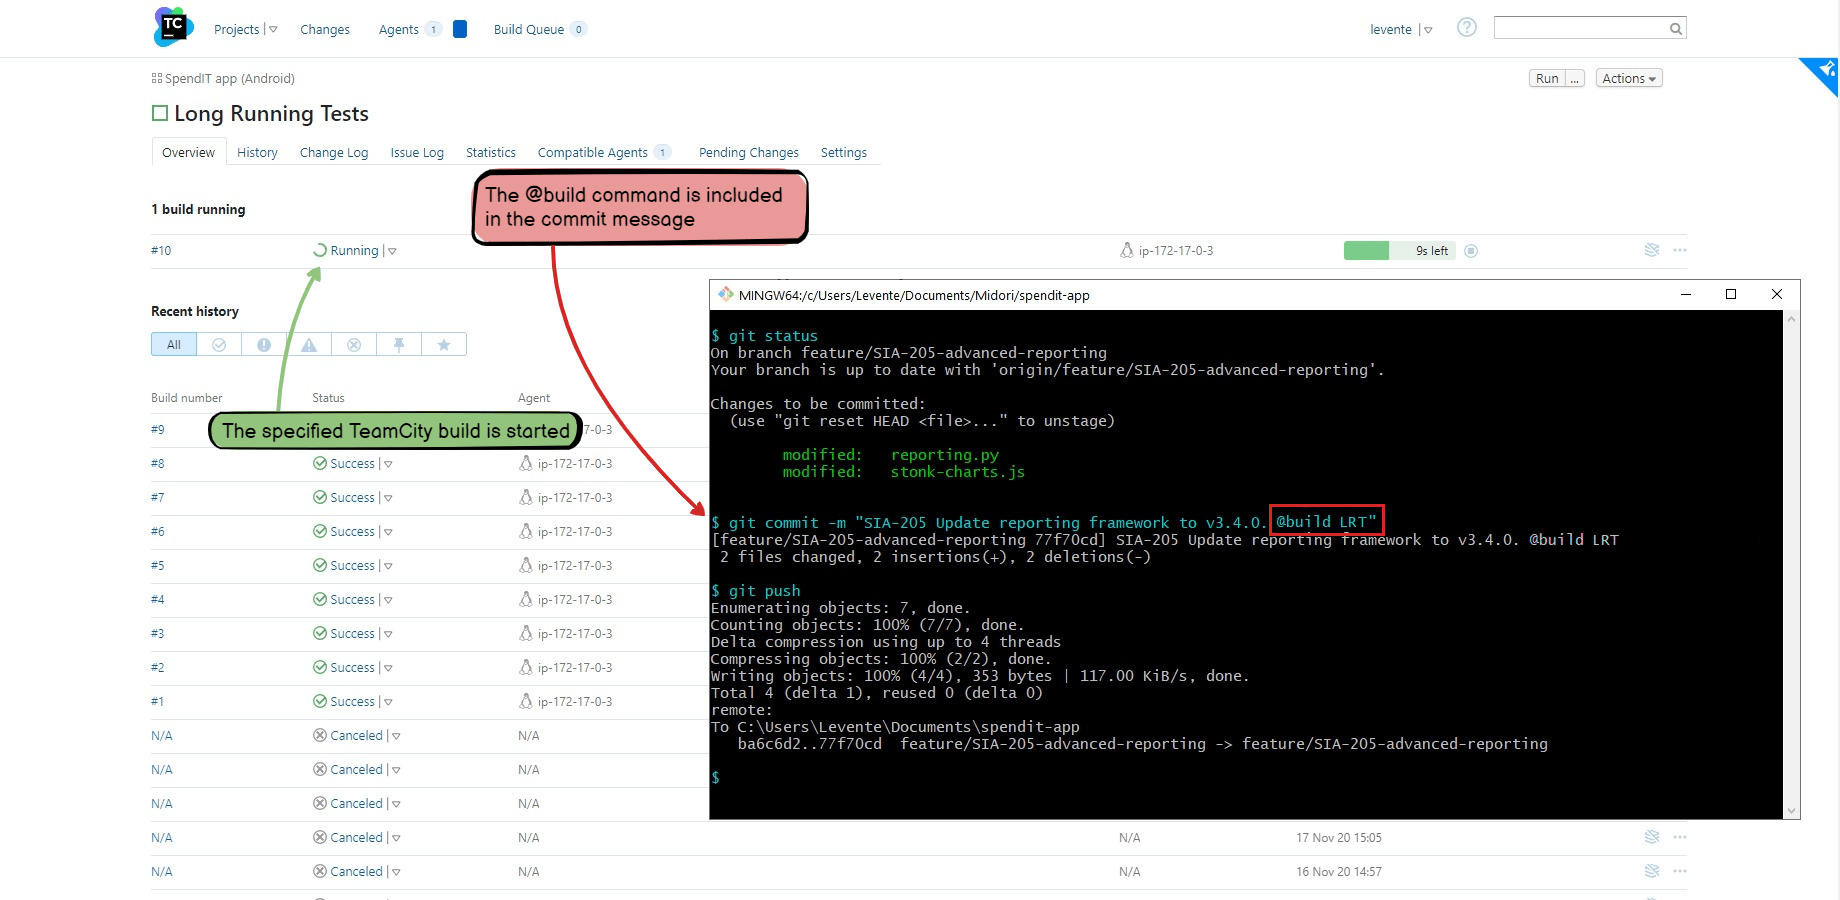
It is a more flexible variant of the previous automation that allows choosing the build configuration.
Configuration
In this example, the parameter "buildConfigId" will be parsed from the commit message and passed to the build.
For this, first implement the "parameterless" automation using the previous guide. Then, execute these additional steps for the parameter:
- Login to Jira as admin, go to Commits → Genius Commands.
- Edit the command named Build.
- Enter the following regular expression as a parameter pattern: (?<buildConfigId>.*).
- Click Save.
- Navigate to Administration → System → Automation rules.
- Select your rule and edit the Send web request action.
-
Modify the Custom data as:
<build>
    <buildType id="{{devops.buildConfigId.xmlEncode}}"/>
</build>
Note that the command parameters should be XML-encoded with .xmlEncode. Learn more about customizing the request in the TeamCity REST API documentation. - Click Save, then Publish changes.
Usage
-
Create a commit with this commit message:
Fix the FOO-1 bug. @build LRT
- The TeamCity build configuration with the ID "LRT" will be started.
Troubleshooting
If you don't get the expected results:
- Check if the @build command is defined in the Genius Commands screen? (It's a default command.)
- Check if the @build command followed by the parameter was included in the commit message?
- See the general troubleshooting steps.
Starting a TeamCity build with a specific command and build configuration parameter
This automation starts a TeamCity build by parsing the build configuration ID from the VCS commit message:
It is a more flexible variant of the previous automation that allows passing a build configuration parameter.
Configuration
In this example, the parameter "buildConfigParameter" will be parsed from the commit message and passed to the build.
For this, first implement the "parameterless" automation using the previous guide. Then, execute these additional steps for the parameter:
- Login to TeamCity as admin, go to your build configuration → Edit Configuration Settings → Parameters.
- Click Add new parameter.
- Enter "profile" in the Name field and set a default value if need (e.g. "production") in the Value field.
- Click Save.
- Login to Jira as admin, go to Commits → Genius Commands.
- Edit the command named Build.
- Enter the following regular expression as a parameter pattern: (?<buildConfigParameter>.*).
- Click Save.
- Navigate to Administration → System → Automation rules.
- Select your rule and edit the Send web request action.
-
Modify the Custom data as:
<build>
    <buildType id="BUILD_CONFIGURATION_ID"/>
    <properties>
        <property name="profile" value="{{devops.buildConfigParameter.xmlEncode}}"/>
    </properties>
</build>
Note that the command parameters should be XML-encoded with .xmlEncode. Learn more about customizing the request in the TeamCity REST API documentation. - Click Save, then Publish changes.
Usage
-
Create a commit with this commit message:
Fix the FOO-1 bug. @build production
- The TeamCity build will be started with the "profile" parameter set to "production".
Troubleshooting
If you don't get the expected results:
- Check if the @build command is defined in the Genius Commands screen? (It's a default command.)
- Check if the @build command followed by the parameter was included in the commit message?
- See the general troubleshooting steps.
Questions?
Ask us any time.