In this page
Sending a notification email about a new changeset
Configuration
Usage
Troubleshooting
Sending a notification email about a rejected changeset
Configuration
Usage
Troubleshooting
Sending a notification email about a new branch
Configuration
Usage
Troubleshooting
Sending a notification email about a new tag
Configuration
Usage
Troubleshooting
Overview
Email is still the most widely used notification medium.
Watch this short tutorial video about creating and using email automations, then follow the step-by-step guides in the next sections:
Sending a notification email about a new changeset
This automation sends a notification email about the changeset after that has been accepted by the repository:
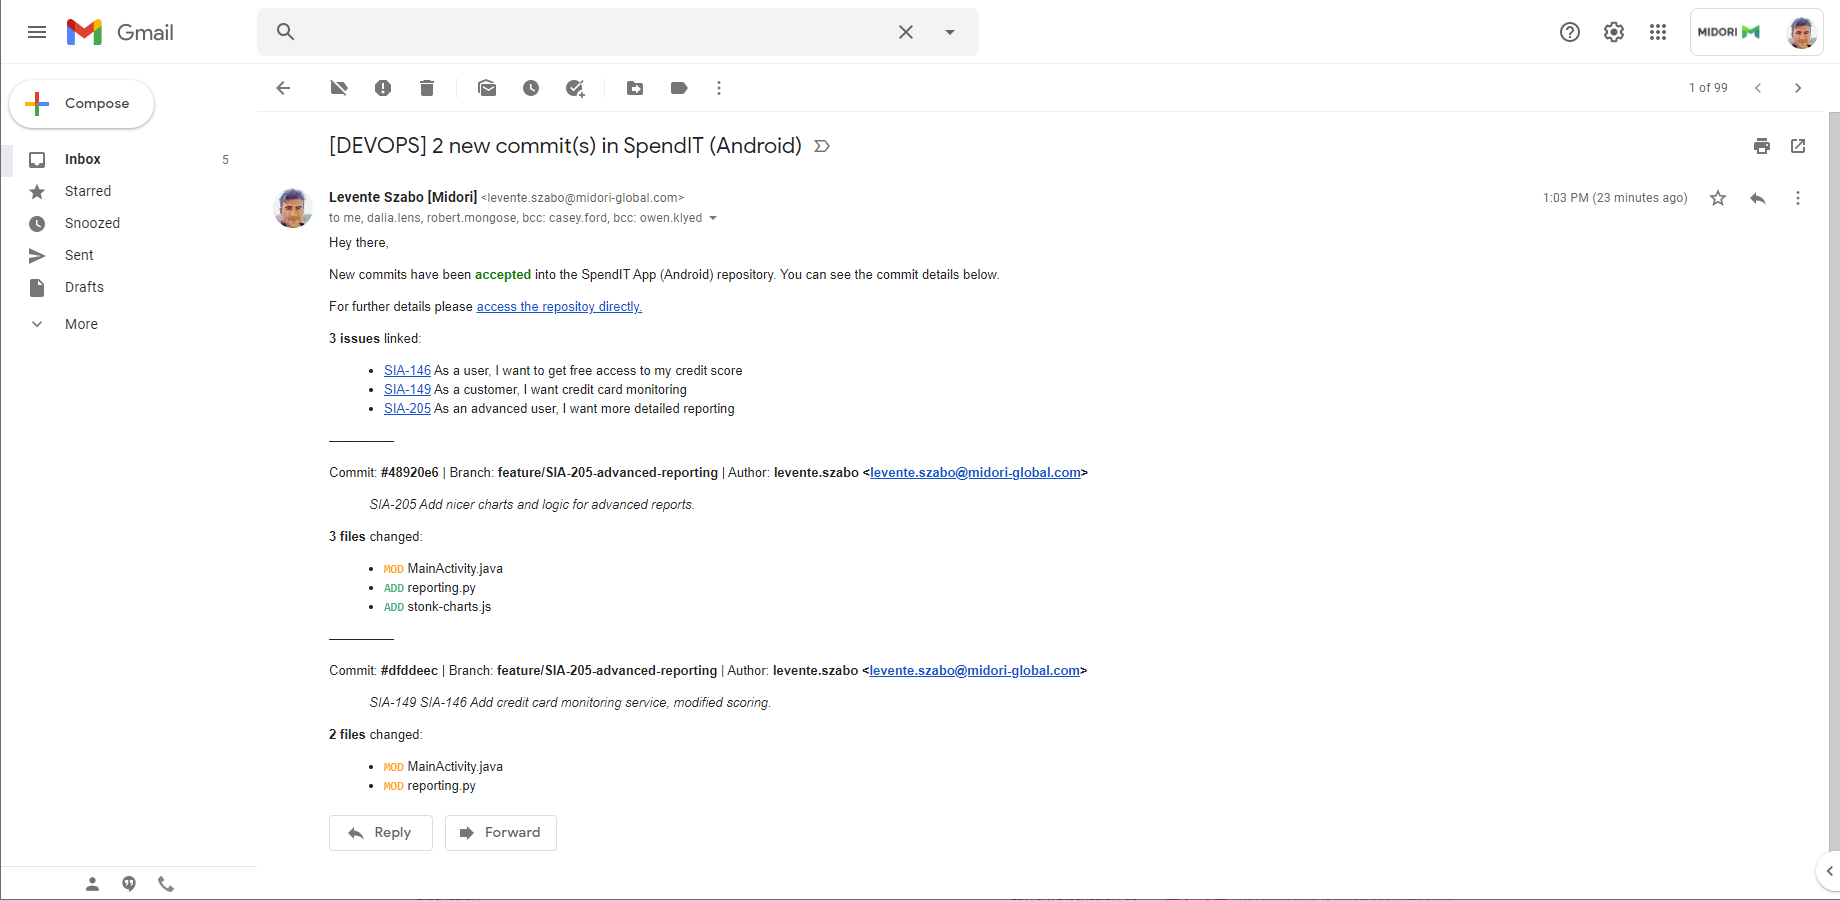
The email recipients, subject, content and other details can be freely customized. Note that you can also use this approach to integrate external services that accept email as "incoming message" format to your DevOps pipelines.
Configuration
- Login to Jira as admin, go to Administration → System → Automation rules.
- Click Create rule.
- Select the trigger Changeset accepted (from the DevOps category).
- Click Save.
- Click Add component and select New condition.
- Select the condition Advanced compare condition.
- Enter {{devops.changeset.commits.size}} to the First value field.
- Choose the does not equal option from the Condition dropdown.
- Enter "0" to the Second value field.
- Click Save.
- Click New action.
- Select the action Send email.
- Choose a recipient group or enter the addresses manually.
-
Enter the following subject:
[DEVOPS] {{devops.changeset.commits.size}} new commit{{#devops.changeset.commits}}{{^first}}{{#last}}s{{/}}{{/}}{{/}}{{^devops.changeset.commits}}s{{/}} in {{devops.changeset.repositoryId.htmlEncode}} -
Enter the following content (a very simple template you can easily customize to your needs):
<p> {{#issues.size}} <b>{{issues.size}} issue{{#issues}}{{^first}}{{#last}}s{{/}}{{/}}{{/}}</b> linked: {{/}} {{^issues.size}} No issues linked. {{/}} </p> <ul> {{#issues}} <li><a href="{{url}}">{{key}}</a> {{summary.htmlEncode}}</li> {{/}} </ul> {{#devops.changeset.commits}} <p>—————</p> <p>Commit: <b>#{{id}}</b> · Branch: <b>{{branch.htmlEncode}}</b> · Author: <b>{{author.htmlEncode}}</b></p> <blockquote style="background:#f4f5f7; padding:0.25em 0.5em; border-left:5px solid #c1c7d0;">{{message.htmlEncode.replace(" ","<br>")}}</blockquote> <p><b>{{files.size}} file{{#files}}{{^first}}{{#last}}s{{/}}{{/}}{{/}}{{^files}}s{{/}}</b> changed:</p> <ul> {{#files}} <li><b><code style="color:{{action.color}}">{{action.label}}</code></b> {{path.htmlEncode}}</li> {{/}} </ul> {{/}}Notes:- Those smart values that can contain HTML-unsafe characters should be HTML-encoded with .htmlEncode.
- Those smart values that can contain multi-line strings should be transformed with .replace(" ","<br>").
- Click More options.
- Choose HTML as format.
- Uncheck the Convert line breaks to HTML line breaks checkbox.
- Click Save.
- Name your automation rule intuitively, and click Turn it on.
Usage
- Create a commit in your repository with this message:
Implement the FOO-1 feature.
- Then another with this:
Fix the FOO-2 and FOO-3 bugs.
- An email will be sent to the selected recipients with the linked issue list and the commit details.
Troubleshooting
If you don't get the expected results:
- See the general troubleshooting steps.
Sending a notification email about a rejected changeset
This automation sends a notification email after a changeset has been rejected by the commit policy (which is applied to the repository).
Configuration
- Login to Jira as admin, go to Administration → System → Automation rules.
- Click Create rule.
- Select the trigger Changeset rejected (from the DevOps category).
- Click Save.
- Click New action.
- Select the action Send email.
- Choose a recipient group or enter the addresses manually.
-
Enter the following subject:
[DEVOPS] Changeset rejected in {{devops.changeset.repositoryId.htmlEncode}} -
Enter the following content (a very simple template you can easily customize to your needs):
<blockquote style="background:#ffebe6; padding:0.25em 0.5em; border-left:5px solid #de350b;">{{devops.rejectionMessage.htmlEncode.replace(" ","<br>")}}</blockquote> <p>—————</p> <p> {{#issues.size}} <b>{{issues.size}} issue{{#issues}}{{^first}}{{#last}}s{{/}}{{/}}{{/}}</b> linked: {{/}} {{^issues.size}} No issues linked. {{/}} </p> <ul> {{#issues}} <li><a href="{{url}}">{{key}}</a> {{summary.htmlEncode}}</li> {{/}} </ul> {{#devops.changeset.commits}} <p>—————</p> <p>Commit: <b>#{{id}}</b> · Branch: <b>{{branch.htmlEncode}}</b> · Author: <b>{{author.htmlEncode}}</b></p> <blockquote style="background:#f4f5f7; padding:0.25em 0.5em; border-left:5px solid #c1c7d0;">{{message.htmlEncode.replace(" ","<br>")}}</blockquote> <p><b>{{files.size}} file{{#files}}{{^first}}{{#last}}s{{/}}{{/}}{{/}}{{^files}}s{{/}}</b> changed:</p> <ul> {{#files}} <li><b><code style="color:{{action.color}}">{{action.label}}</code></b> {{path.htmlEncode}}</li> {{/}} </ul> {{/}}Notes:- Those smart values that can contain HTML-unsafe characters should be HTML-encoded with .htmlEncode.
- Those smart values that can contain multi-line strings should be transformed with .replace(" ","<br>").
- Click More options.
- Choose HTML as format.
- Uncheck the Convert line breaks to HTML line breaks checkbox.
- Click Save.
- Name your automation rule intuitively, and click Turn it on.
Usage
- Create a commit in your repository which results in rejection.
- An email will be sent to the selected recipients with the repository ID and the rejection message.
Troubleshooting
If you don't get the expected results:
- See the general troubleshooting steps.
Sending a notification email about a new branch
This automation sends a notification email about a branch after that has been created in the repository.
Configuration
- Login to Jira as admin, go to Administration → System → Automation rules.
- Click Create rule.
- Select the trigger Branch created (from the DevOps category).
- Click Save.
- Click New action.
- Select the action Send email.
- Choose a recipient group or enter the addresses manually.
-
Enter the following subject:
[DEVOPS] New branch "{{devops.branch.htmlEncode}}" in {{devops.changeset.repositoryId.htmlEncode}} -
Enter the following content (a very simple template you can easily customize to your needs):
<p> New branch created in repository <b>{{devops.changeset.repositoryId.htmlEncode}}</b>: "{{devops.branch.htmlEncode}}" </p> <p> {{#issues.size}} <b>{{issues.size}} issue{{#issues}}{{^first}}{{#last}}s{{/}}{{/}}{{/}}</b> linked: {{/}} {{^issues.size}} No issues linked. {{/}} </p> <ul> {{#issues}} <li><a href="{{url}}">{{key}}</a> {{summary.htmlEncode}}</li> {{/}} </ul>Notes:- Those smart values that can contain HTML-unsafe characters should be HTML-encoded with .htmlEncode.
- Those smart values that can contain multi-line strings should be transformed with .replace(" ","<br>").
- Click More options.
- Choose HTML as format.
- Uncheck the Convert line breaks to HTML line breaks checkbox.
- Click Save.
- Name your automation rule intuitively, and click Turn it on.
Usage
- Create a branch and push that to your repository.
- An email will be sent to the selected recipients with the repository name and the branch name.
Troubleshooting
If you don't get the expected results:
- See the general troubleshooting steps.
Sending a notification email about a new tag
This automation sends a notification email about a tag after that has been created in the repository.
Configuration
- Login to Jira as admin, go to Administration → System → Automation rules.
- Click Create rule.
- Select the trigger Tag created (from the DevOps category).
- Click Save.
- Click New action.
- Select the action Send email.
- Choose a recipient group or enter the addresses manually.
-
Enter the following subject:
[DEVOPS] New tag "{{devops.tag.htmlEncode}}" in {{devops.changeset.repositoryId.htmlEncode}} -
Enter the following content (a very simple template you can easily customize to your needs):
<p> New tag created in repository <b>{{devops.changeset.repositoryId.htmlEncode}}</b>: "{{devops.tag.htmlEncode}}" </p> <p> {{#issues.size}} <b>{{issues.size}} issue{{#issues}}{{^first}}{{#last}}s{{/}}{{/}}{{/}}</b> linked: {{/}} {{^issues.size}} No issues linked. {{/}} </p> <ul> {{#issues}} <li><a href="{{url}}">{{key}}</a> {{summary.htmlEncode}}</li> {{/}} </ul>Notes:- Those smart values that can contain HTML-unsafe characters should be HTML-encoded with .htmlEncode.
- Those smart values that can contain multi-line strings should be transformed with .replace(" ","<br>").
- Click More options.
- Choose HTML as format.
- Uncheck the Convert line breaks to HTML line breaks checkbox.
- Click Save.
- Name your automation rule intuitively, and click Turn it on.
Usage
- Create a tag and push that to your repository.
- An email will be sent to the selected recipients with the repository name and the tag name.
Troubleshooting
If you don't get the expected results:
- See the general troubleshooting steps.
Questions?
Ask us any time.