
In this page
Types of calculated fields
Built-in calculated fields
Custom calculated fields
Tutorial video
Using calculated fields
In the Issue Navigator
In custom templates
Working with the script that implements calculated fields
Modifying built-in calculated fields
Implementing custom calculated fields
Field name collisions
What are calculated fields?
A calculated field in Better Excel Exporter is a field that is not an actual Jira field, but its value is dynamically calculated at the time the Excel file is being exported.
Some examples for field value calculations:
- Get the text of the latest comment of an issue.
- Get the value of multiple fields and combine them using some logic, that involves if-then decisions and a formula.
- Get the value by the fields of other issues, like sub-tasks, linked issues, epics, etc.
- Get the value by connecting to an external API, system or database.
Calculated fields are identified by their unique names. As they may not even exist in Jira, they don't have ID's. Their values, data types (ex: text, number, date) and data format specifiers (ex: "0.00") are calculated by a Groovy script.
Types of calculated fields
Calculated fields can be used in two ways:
- Built-in calculated fields are provided by the app for the most frequent use cases.
- Custom calculated fields can be easily added for specific needs.
Built-in calculated fields
You can add the built-in calculated fields to your Excel exports without any scripting.
If you wanted to export the last comment for your issue, you can do that easily by using 3 built-in calculated fields:
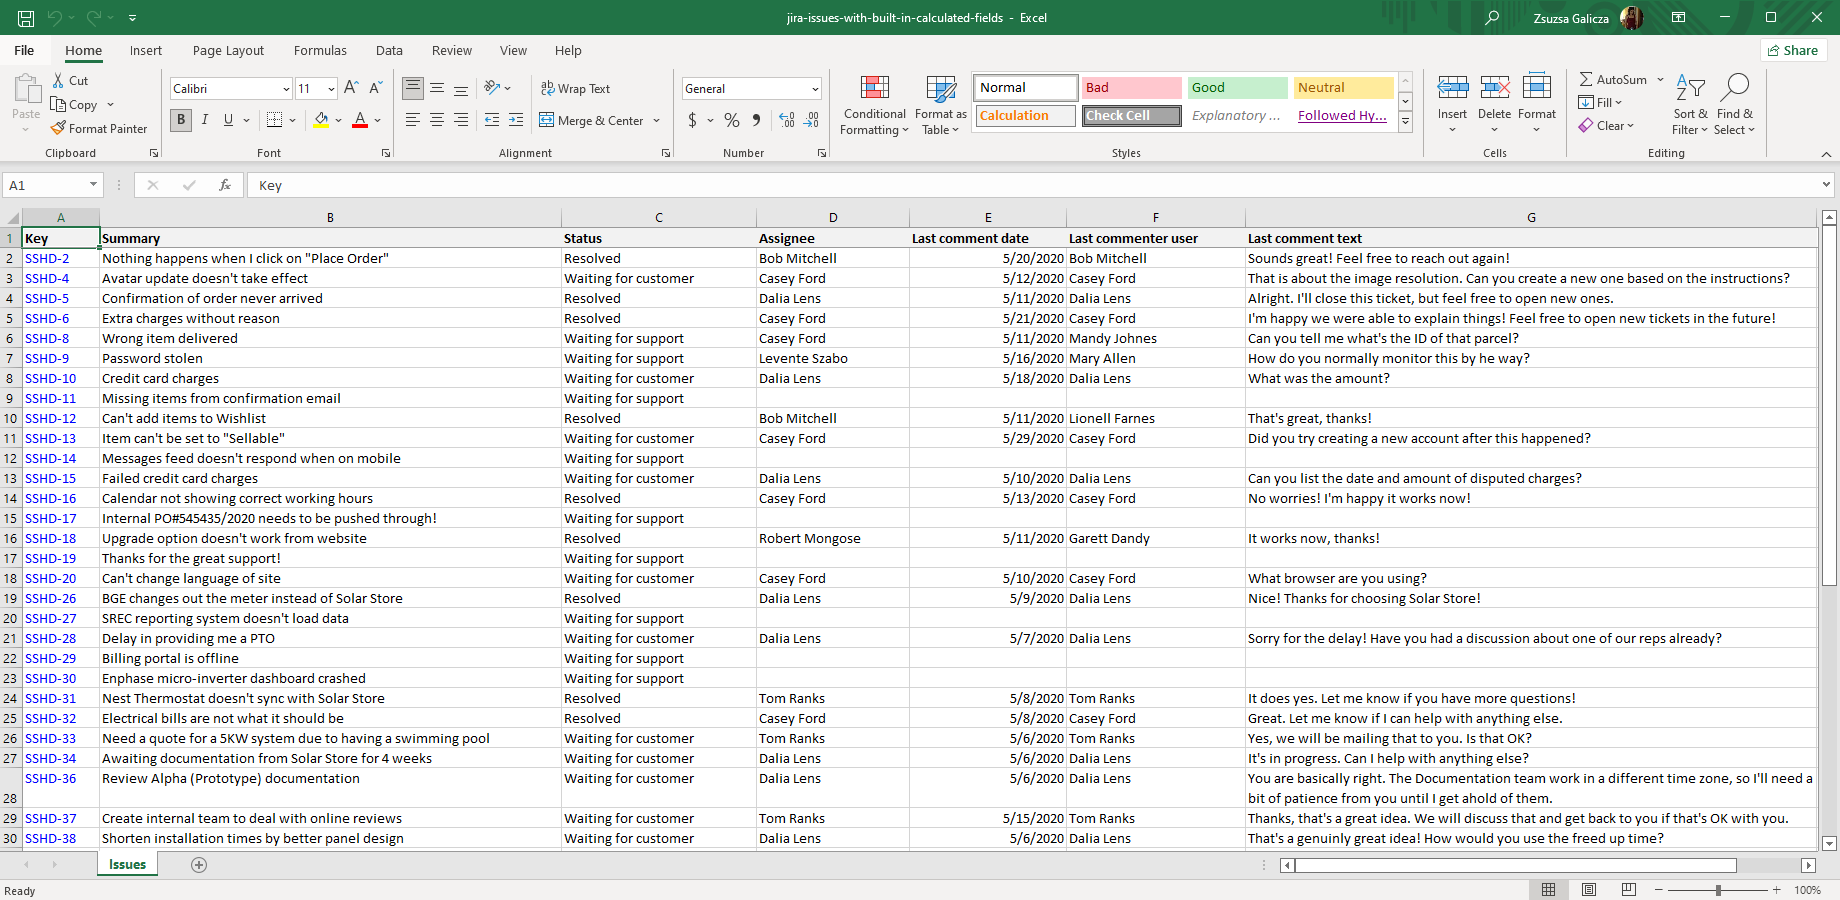
The following built-in calculated fields are available:
| Calculated field name | Description |
|---|---|
| Excel parent key | Key of the parent issue or a blank string if the current issue is not a sub-task. Based on the issueKeyAsLink boolean configuration variable in field-helper-tool.groovy, this is rendered as a clickable link (default) or as plain text. (since 2.4.0) |
| Excel comments | Text, user and date of all comments. It is a longer block of text that can be inserted into a single Excel cell. If you need only the first or last comments, and more granularity, see the next items. |
| Excel first comment | Text, user and date of the first (earliest) comment. It is a block of text that can be inserted into a single Excel cell. If you need more granularity or better data types, see the next 3 items. |
| Excel first comment text | The actual text of the first comment. |
| Excel first comment user | The user who added the first comment. |
| Excel first comment date | The date when the first comment was added. |
| Excel last comment | Text, user and date of the last (latest) comment. It is a block text of that can be inserted into a single Excel cell. If you need more granularity or better data types, see the next 3 items. |
| Excel last comment text | The actual text of the last comment. |
| Excel last comment user | The user who added the last comment. |
| Excel last comment date | The date when the last comment was added. |
Note that if you'd like to modify a built-in calculated field (e.g. changing its format), it is possible! See this guide.
Custom calculated fields
If you have custom requirements, you will write the short Groovy script that implements the field. It does so by defining the value, the data type and the data format for the Excel cell.
For example, the 3 rightmost columns in this Excel spreadsheet are implemented with custom calculated fields:
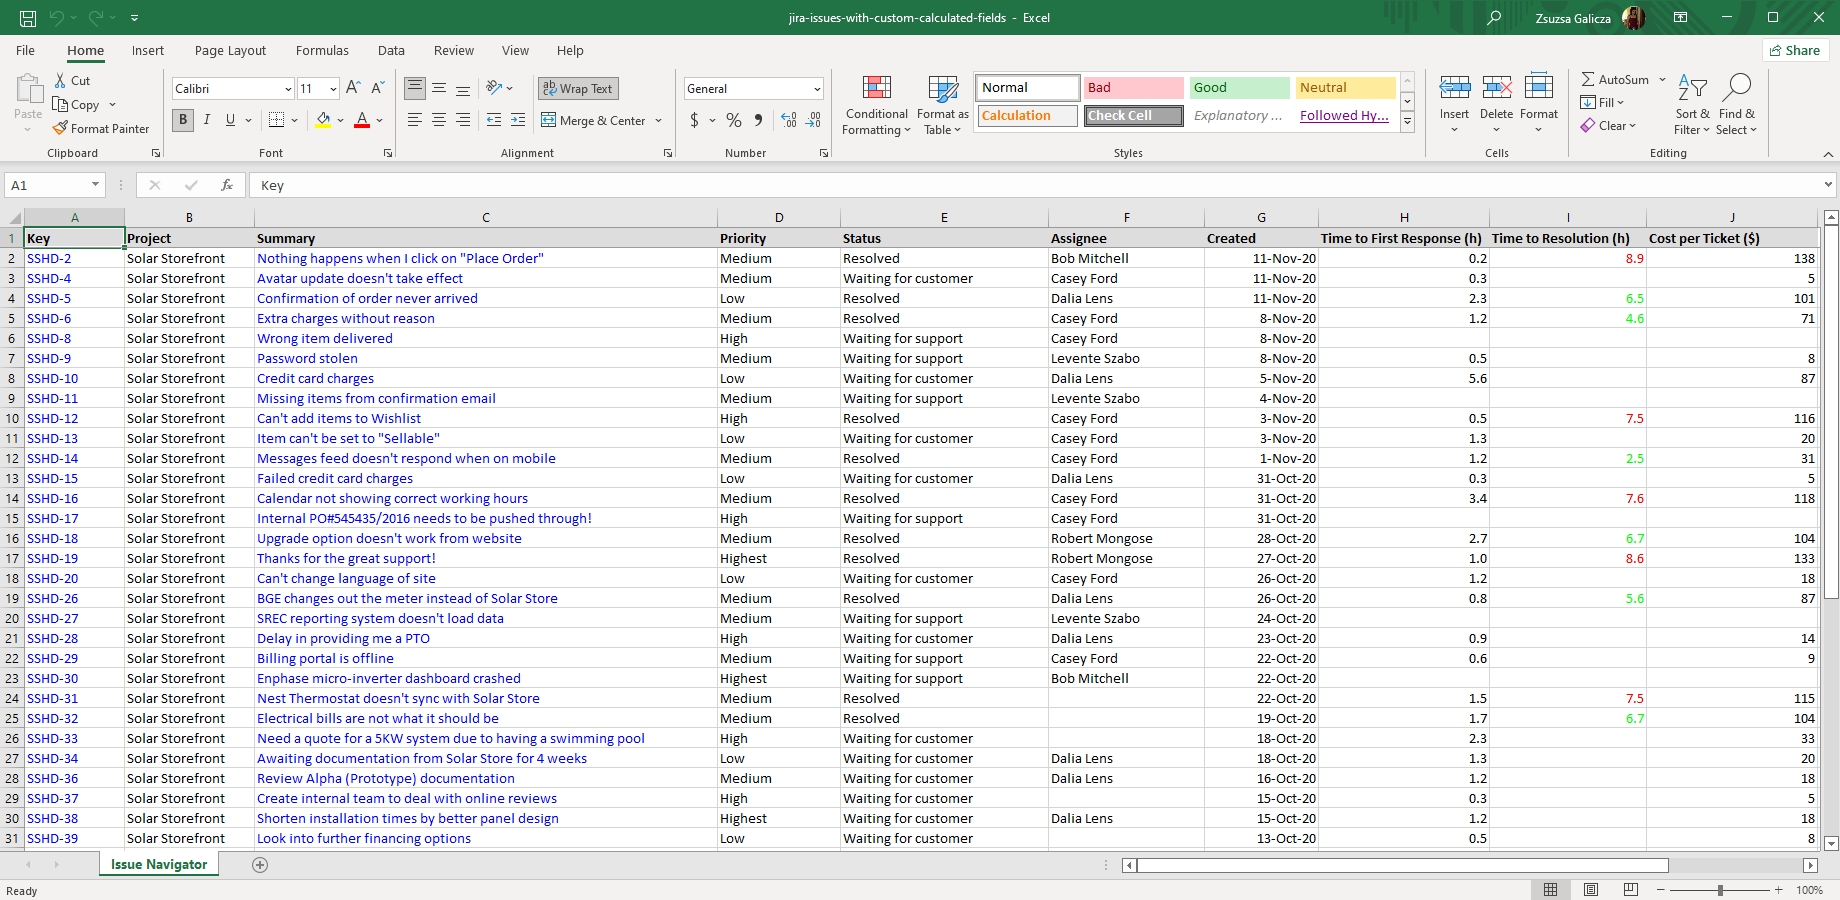
See the implementing custom calculated fields section.
Tutorial video
This short tutorial video shows the following important cases:
- First part: exporting built-in calculated fields from the Issue Navigator (also applies to custom calculated fields!).
- Second part: implementing a new custom calculated field.

Using calculated fields
This section explains how to export calculated fields either by adding columns to the Issue Navigator, or by using the corresponding expressions in custom templates.
In the Issue Navigator
As the calculated fields are not actual Jira fields, they cannot be added to the columns visible in Issue Navigator, thus cannot be exported.
How to overcome this? Just create a "dummy" custom field that acts as a placeholder for the calculated field, then add that to your Issue Navigator column configuration.
Steps:
- First, create a new Jira custom field with the name of the calculated field you wanted to export. Make sure you use the precise calculated field name from the table above! You can choose any custom field type, because the value is returned by the script, not from the actual custom field. The "Text Field (read only)" custom field type is a good choice, as your users will not be able to alter its blank value and it will not mislead them.
- Add the newly created custom field to your Issue Navigator columns. (The corresponding column will be displayed with all blank values in the web interface, but it is normal.)
- Make an export and voila, the Excel column is filled with the calculated values!
Also, watch the first part of the tutorial video that basically executes these steps.
In custom templates
If you created a custom field for the calculated field, you can just use the custom field ID in the expressions:
${fieldHelper.getFieldValue(issue, "customfield_10000")}
As $fieldHelper also accepts calculated field names, you can use the following alternative expression:
${fieldHelper.getFieldValue(issue, "Excel last comment text")}
The advantage of using the second expression is that you do not need to create the dummy custom field. The disadvantage is that if you rename the calculated field, the expression will break, for obvious reasons.
Working with the script that implements calculated fields
The three aspects (value, data type, data format) of the calculated fields are implemented as three methods in field-helper-tool.groovy script.
Modifying a built-in calculated field or implementing a new one means working with the getCalculatedXxx() methods in that script:
getCalculatedFieldValue()
getCalculatedFieldCellType()
getCalculatedFieldFormat()
Modifying built-in calculated fields
Let's see a concrete example how to modify a calculated field!
Customizing the format of the comments' submission dates is a common need for users, and doing this by altering field-helper-tool.groovy is easy. Assume we want the year, month and day values to appear in their respective order and in all numeric.
Since we need to change the formatting, it's straightforward to look for the getCalculatedFieldFormat method:
private def getCalculatedFieldFormat(customField) {
	switch(customField.name) {
		case EXCEL_FIRST_COMMENT_DATE_CALCULATED_FIELD_NAME:
		case EXCEL_LAST_COMMENT_DATE_CALCULATED_FIELD_NAME:
			"dd/mm/yyyy hh:mm" // <- change this format pattern!
			break

		default:
			// no custom format
			null
	}
}
Just modify the format string like this::
case EXCEL_FIRST_COMMENT_DATE_CALCULATED_FIELD_NAME:
case EXCEL_LAST_COMMENT_DATE_CALCULATED_FIELD_NAME:
	"yyyy/mmm/dd hh:mm" // <- this is the new pattern
	break
That's it! You will see the new format immediately when generating a new Excel export.
Implementing custom calculated fields
Adding a calculated field is almost as easy as modifying an existing one. Just introduce the new field type in the beginning of the script, then modify the three methods that implement the calculated fields (see above).
Prior to doing this, you may want to watch the second part of the tutorial video that shows the required steps.
Let's dive in right now with a concrete example!
We are going to implement a new custom field that shows whether the issue's assignee is an active Jira user account, using red/green text coloring in the Excel cells for better visual indication. To demonstrate all customization features, we will:
- Return a numeric 0 or 1 value, based on whether the assignee is active or not
- Use Excel custom number format codes to turn these numeric values into colored "active"/"inactive" texts
First, add a new constant for the name of the new calculated field near the beginning of the FieldHelperTool class. We will call this USER_IS_ACTIVE_FIELD_NAME in our example. Also make sure you add the new constant to the CALCULATED_FIELD_NAMES list right below the declaration.
...
private static EXCEL_LAST_COMMENT_DATE_CALCULATED_FIELD_NAME = "Excel last comment date"
private static USER_IS_ACTIVE_FIELD_NAME = "User is active" // <- our new calculated field name

private static CALCULATED_FIELD_NAMES = [ EXCEL_COMMENTS_CALCULATED_FIELD_NAME,
	EXCEL_FIRST_COMMENT_CALCULATED_FIELD_NAME, EXCEL_FIRST_COMMENT_TEXT_CALCULATED_FIELD_NAME, EXCEL_FIRST_COMMENT_AUTHOR_CALCULATED_FIELD_NAME, EXCEL_FIRST_COMMENT_DATE_CALCULATED_FIELD_NAME,
	EXCEL_LAST_COMMENT_CALCULATED_FIELD_NAME, EXCEL_LAST_COMMENT_TEXT_CALCULATED_FIELD_NAME, EXCEL_LAST_COMMENT_AUTHOR_CALCULATED_FIELD_NAME, EXCEL_LAST_COMMENT_DATE_CALCULATED_FIELD_NAME,
	USER_IS_ACTIVE_FIELD_NAME ] // <- also added here
Then add a new "case" with the field name to getCalculatedFieldValue():
private def getCalculatedFieldValue(issue, customField) {
	// ...
	case USER_IS_ACTIVE_FIELD_NAME:
		issue.assignee.active ? 1 : 0
		break
Also add a new "case" to getCalculatedFieldCellType(), and specify that the cell has a numeric value (otherwise custom number format codes will not work):
private def getCalculatedFieldCellType(customField) {
	// ...
	case USER_IS_ACTIVE_FIELD_NAME:
		"number"
		break
Finally, add a new "case" to getCalculatedFieldFormat(), and use an Excel formatting expression that says: if the value is greater than zero, render the word "active" in green, otherwise render the word "inactive" in red (pretty smart, right?):
private def getCalculatedFieldFormat(customField) {
	// ...
	case USER_IS_ACTIVE_FIELD_NAME:
		'[Green][>0]"active";[Red]"inactive"'
		break
To test your newly added calculated field:
- Create a new Jira custom field (any type) with the exact name User is active.
- Add this custom field to the columns in the Issue Navigator, and export your issue list to Excel.
- Your column should be filled with green "active" and red "inactive" values!
Field name collisions
If you are not careful enough, your calculated field names might be identical with other field names, thus "collide" with those. Here is what you should expect in those situations:
- It is completely valid to reuse the name of a system field as a calculated field name (ex: "Summary"), but it may confuse your users.
- If you reuse the name of an existing custom field, the calculated field will override that in the output. Instead of exporting the actual value stored in the custom field, the value generated by the Groovy script will be exported.
- If you reuse the name of an existing calculated field, the one appearing higher in the switch-case blocks in the Groovy handler methods will take precedence. That means you should always keep a consistent ordering of case sections in all handler methods. (Which is a best practice anyway.)
- You might create mutiple distinct Jira custom fields referencing the same calculated field by their name. That will not cause any problems, the calculated field may get rendered multiple times in the output. This is probably not what you want, so remove the surplus fields.
Questions?
Ask us any time.